My Courses
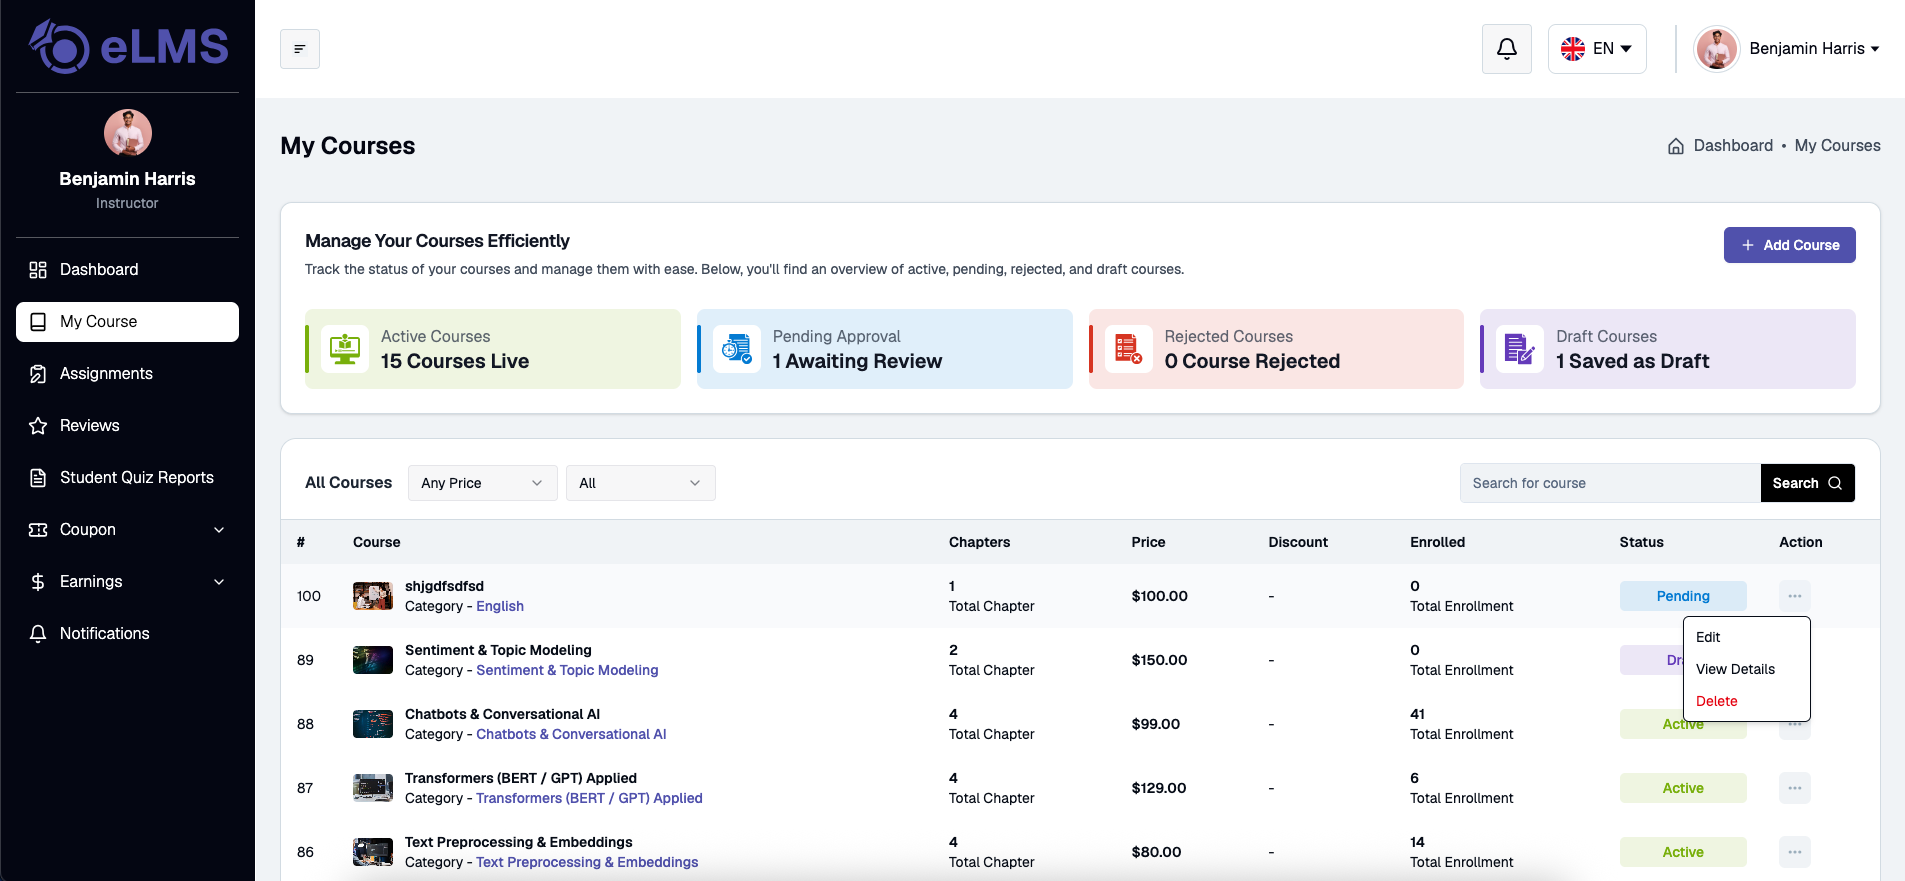
The My Courses page allows instructors and team instructors to manage all their created courses from a single place. It provides course statistics, management actions, and a detailed listing of all courses.
Course Overview
Displays course counts grouped by their current status: Active, Pending Approval, Rejected, and Draft.
Course Listing
Displays all instructor courses with details such as course title, category, chapter count, pricing, enrollments, and status. Each course in the listing includes action options to view Course Details and Edit the course.
Course Creation & Editing
Instructors can create new courses via Add Course or modify existing courses via Edit Course. Selecting Edit opens the pre-populated course form, allowing instructors to update existing details, pricing settings, curriculum structure, and publish settings. The process consists of four main steps:
Step 1: Create Course
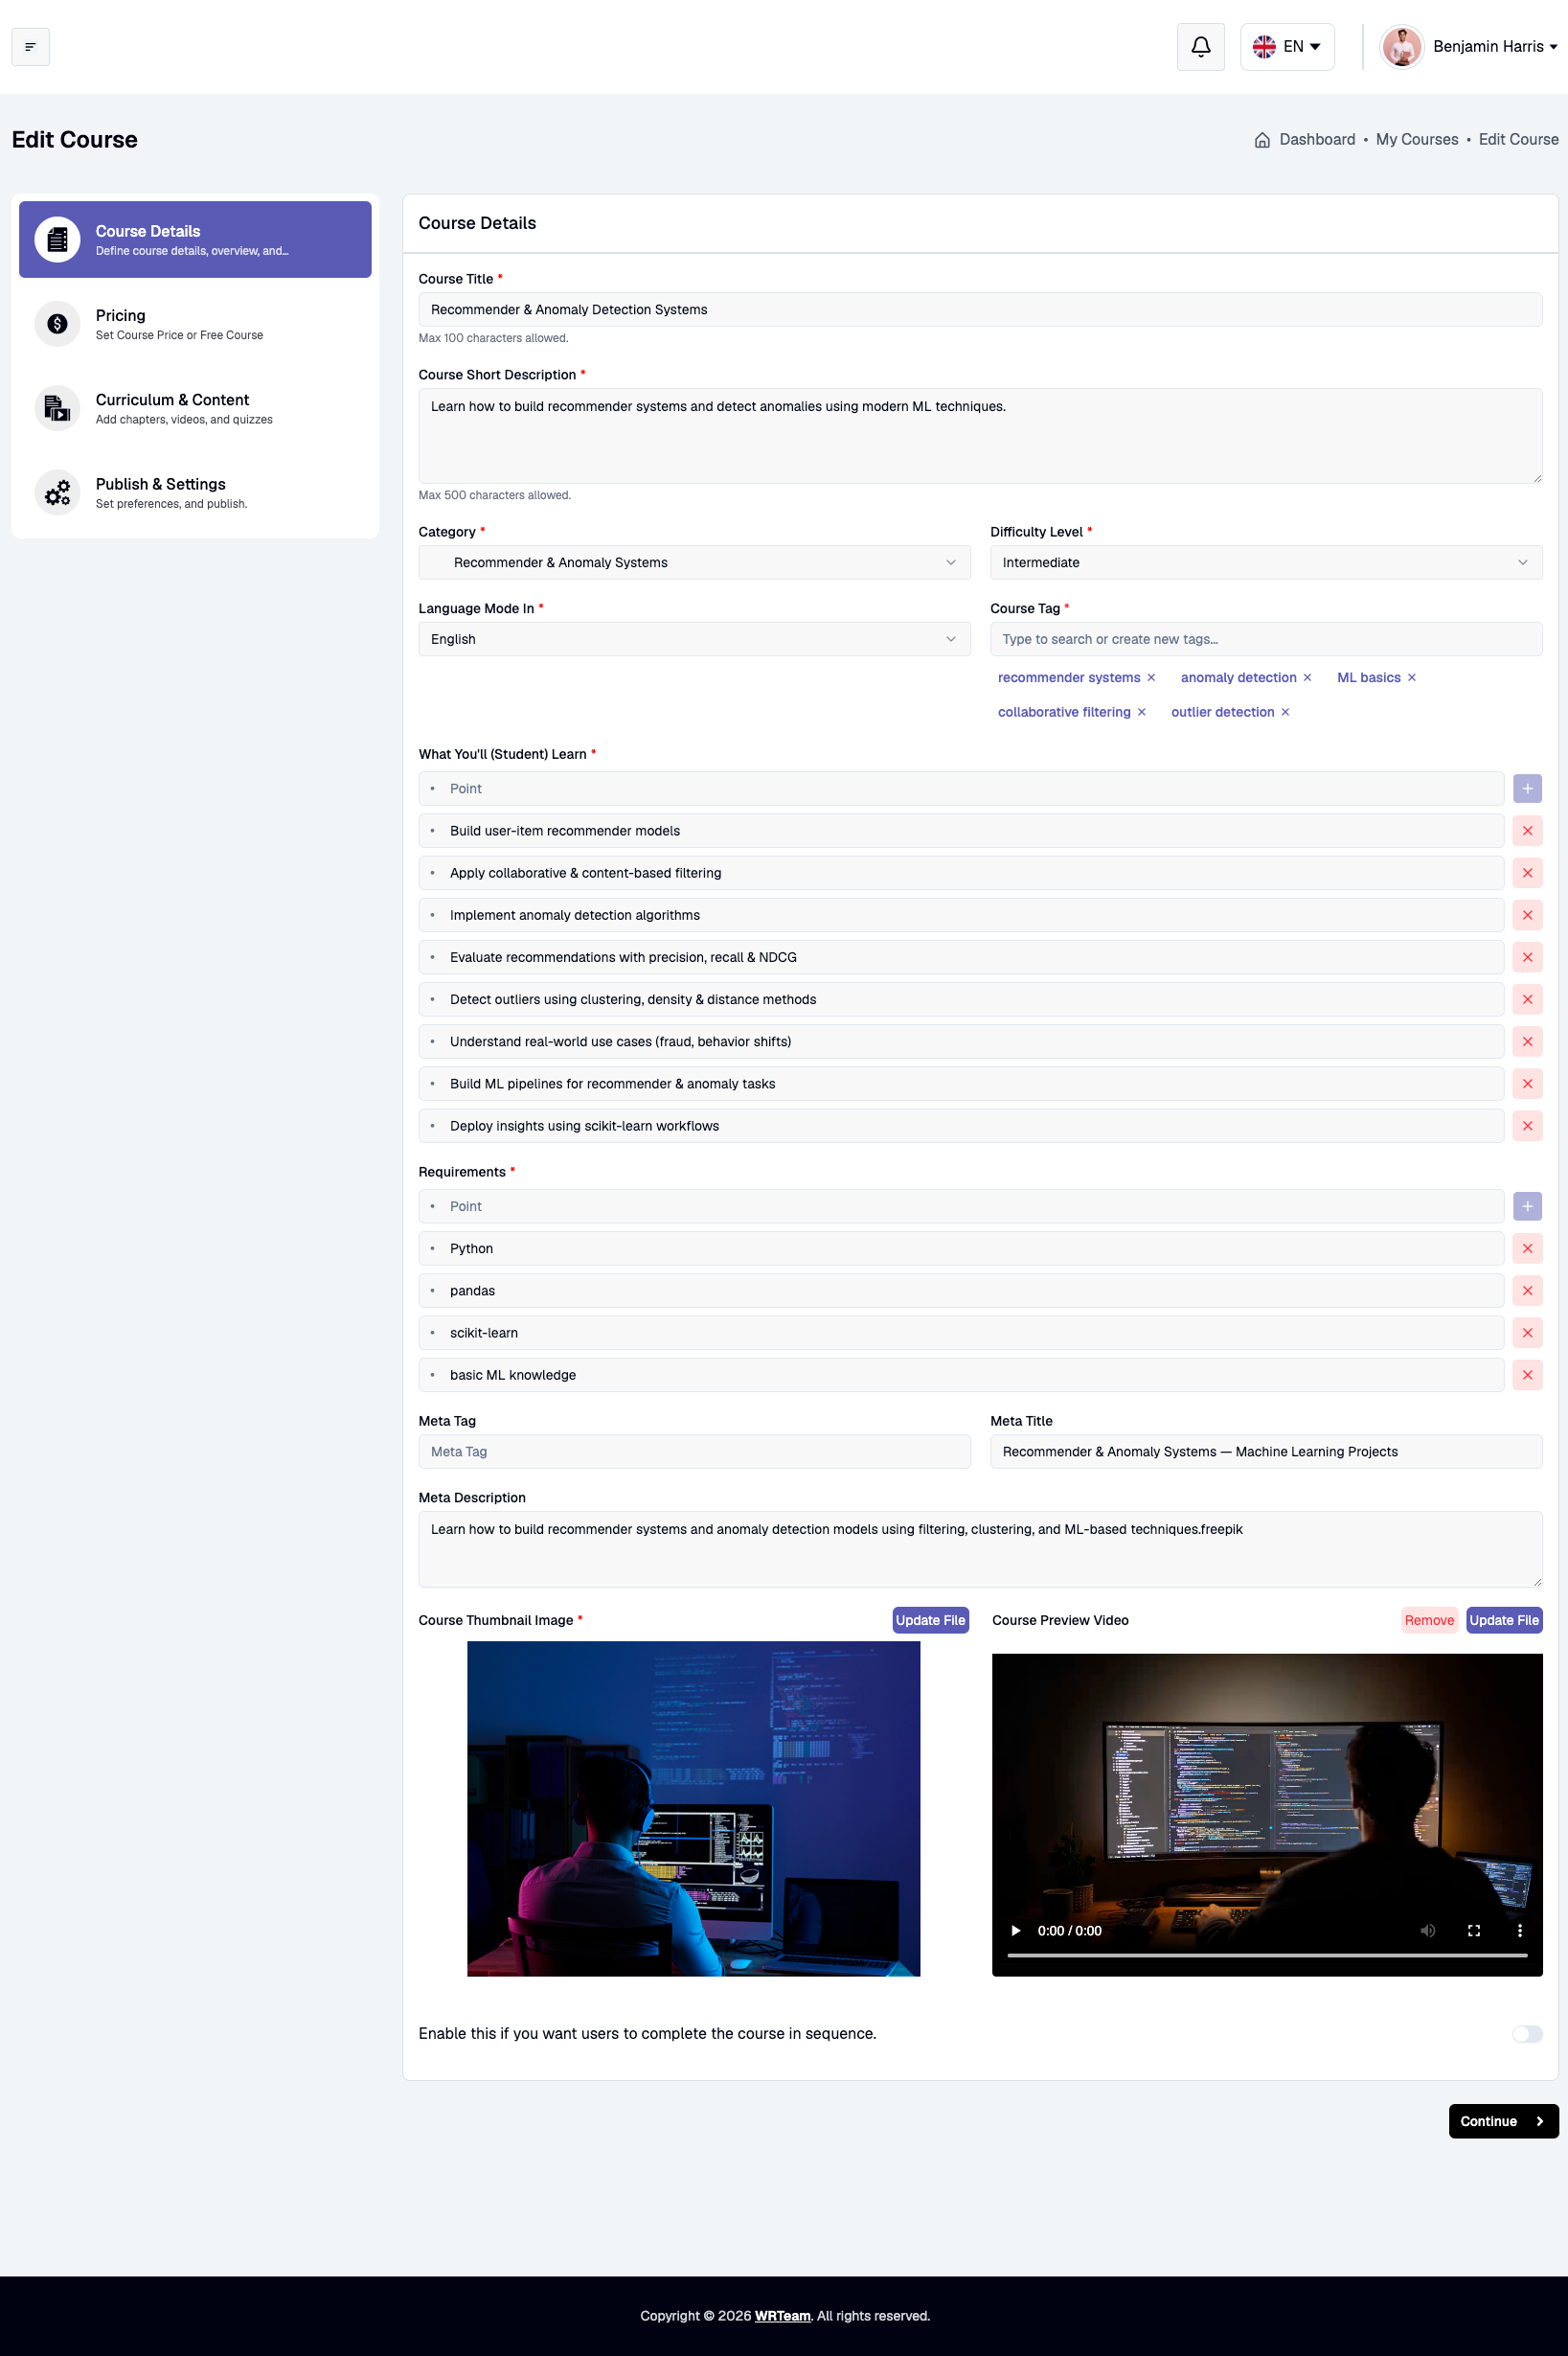
Defines basic course information and metadata:
- Course Title (Required): Title of the course (Max 100 characters).
- Course Short Description (Required): Summary overview (Max 500 characters).
- Category & Sub Category (Required): Subject classification for search and filtering.
- Difficulty Level (Required): Course level (e.g., Beginner, Intermediate, Advanced).
- Language Mode In (Required): Primary language of instruction.
- Course Tag (Required): Search tags (supports selecting or creating new tags).
- What You'll (Student) Learn (Required): Bullet points of learning outcomes.
- Requirements (Required): Prerequisites or required tools.
- Meta Tag, Meta Title, Meta Description: SEO information for search engine optimization.
- Course Thumbnail Image & Course Preview Video (Required): Visual assets representing the course.
- Sequential Completion Toggle: Option to force sequential video/content progression.
- Team Course: Co-instructors can be selected while creating a new course in team mode. If no co-instructors have been added to the team yet, they can also be invited directly from this screen. All co-instructors of a course can manage its details and discussions together.
Step 2: Pricing
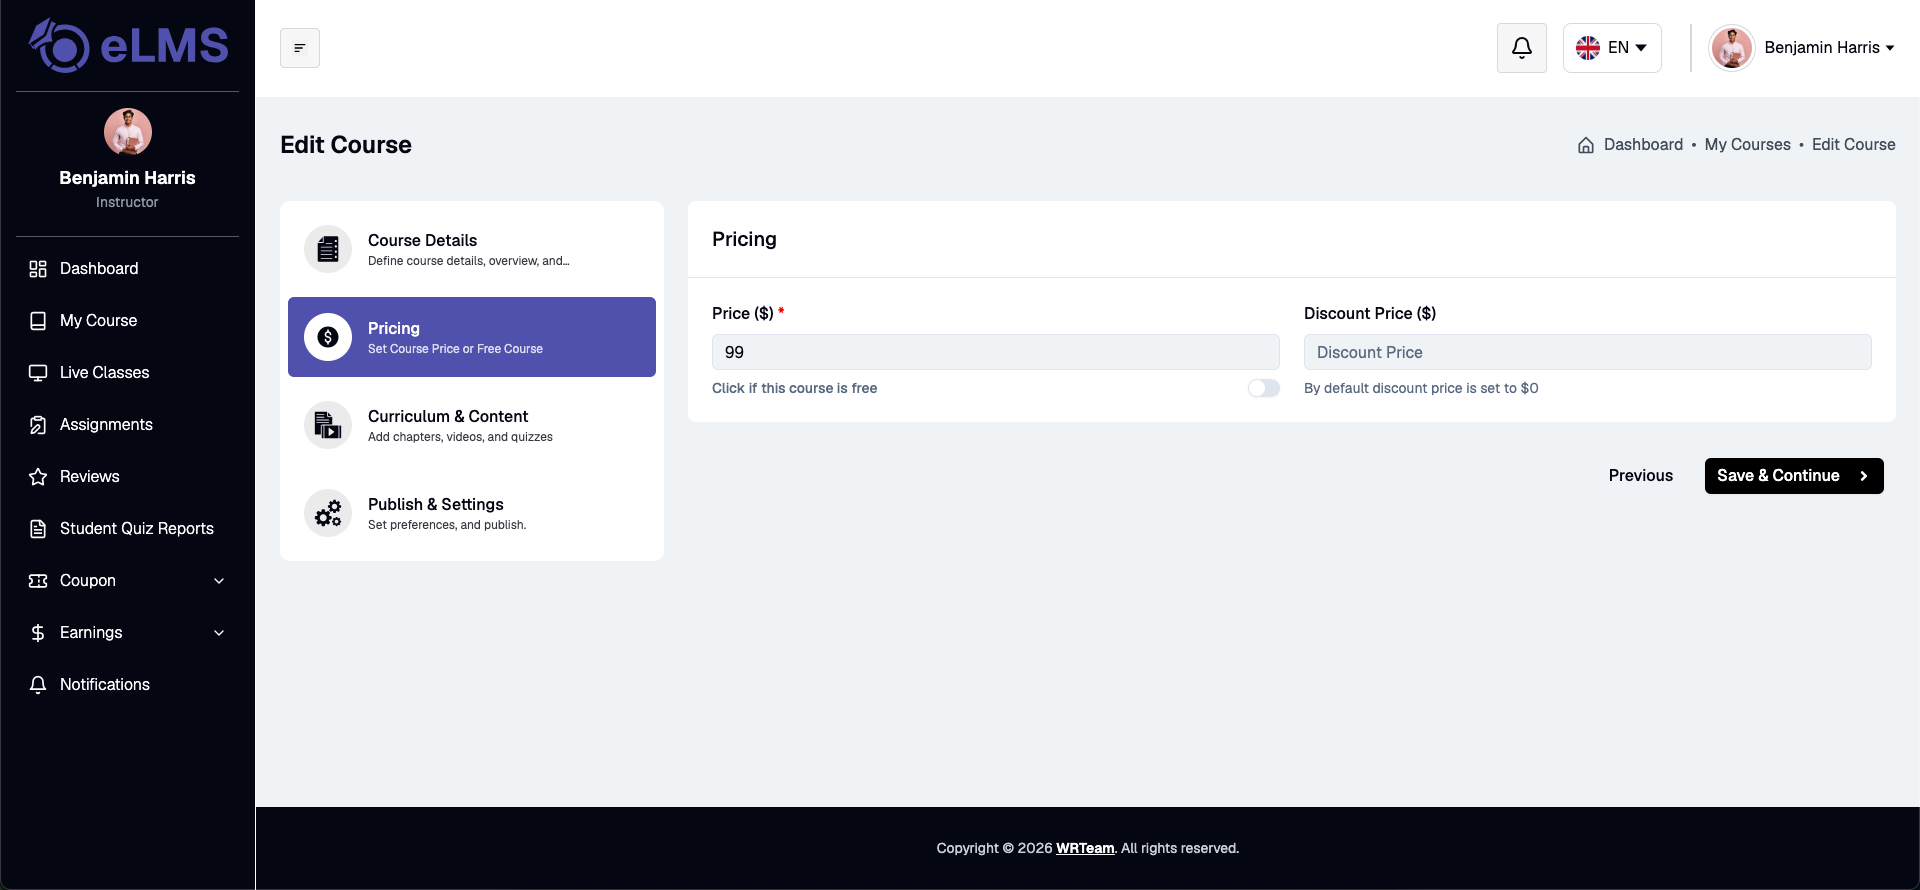
Sets the pricing configuration:
- Click if this course is free: Toggle switch to make the course free.
- Price ($) (Required for paid courses): Standard course price.
- Discount Price ($): Discounted offer price (defaults to $0).
Step 3: Curriculum & Content
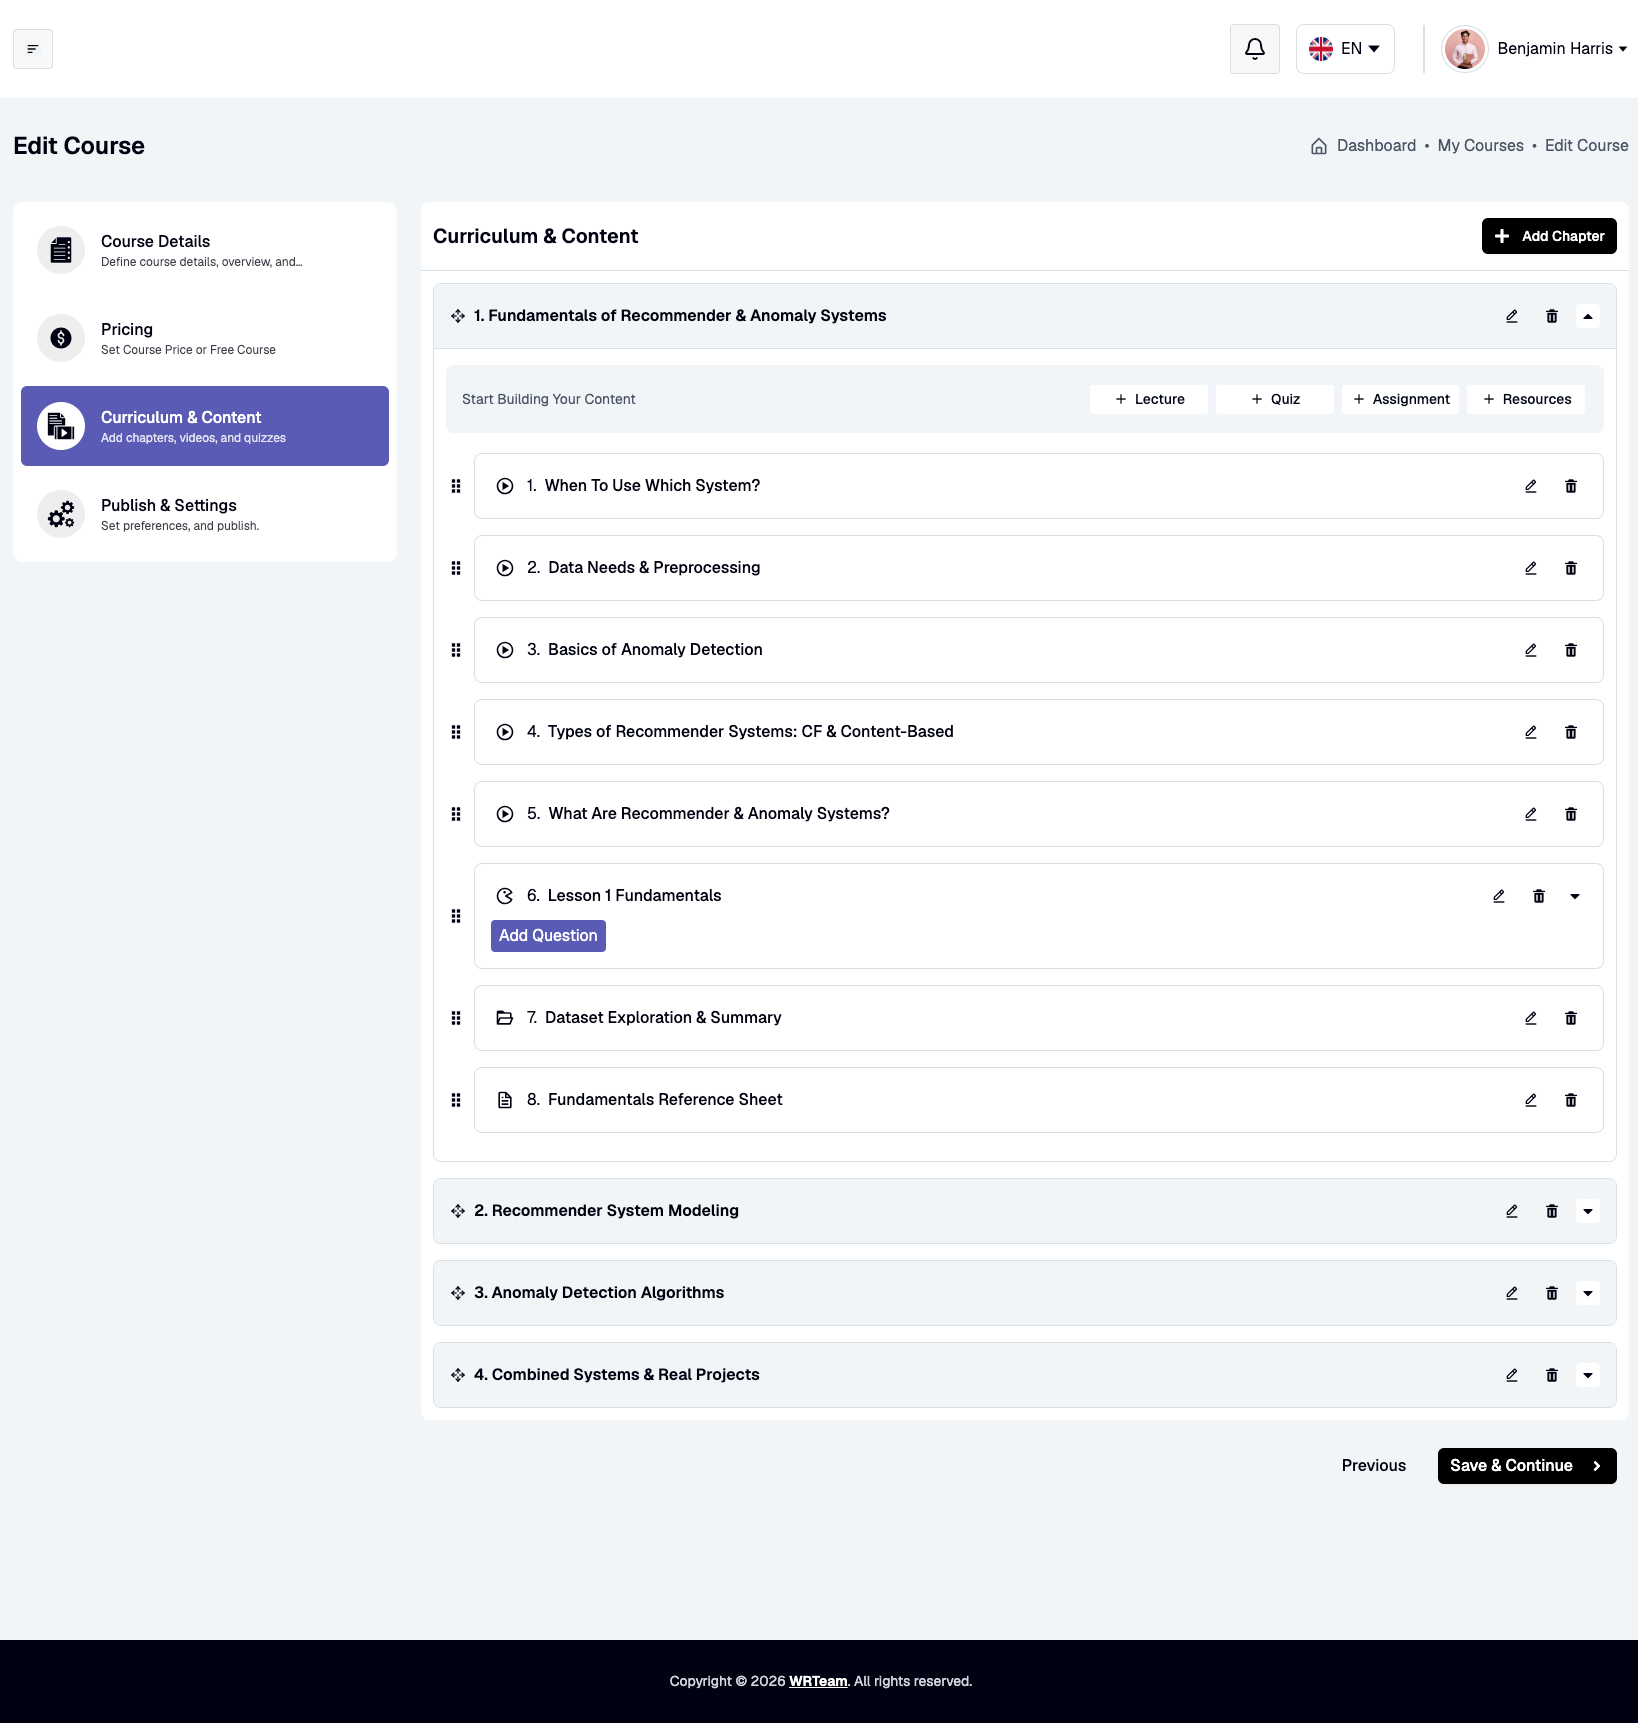
Instructors build and structure course content through step-by-step chapter creation and curriculum item additions:
Step 1: Add Chapter
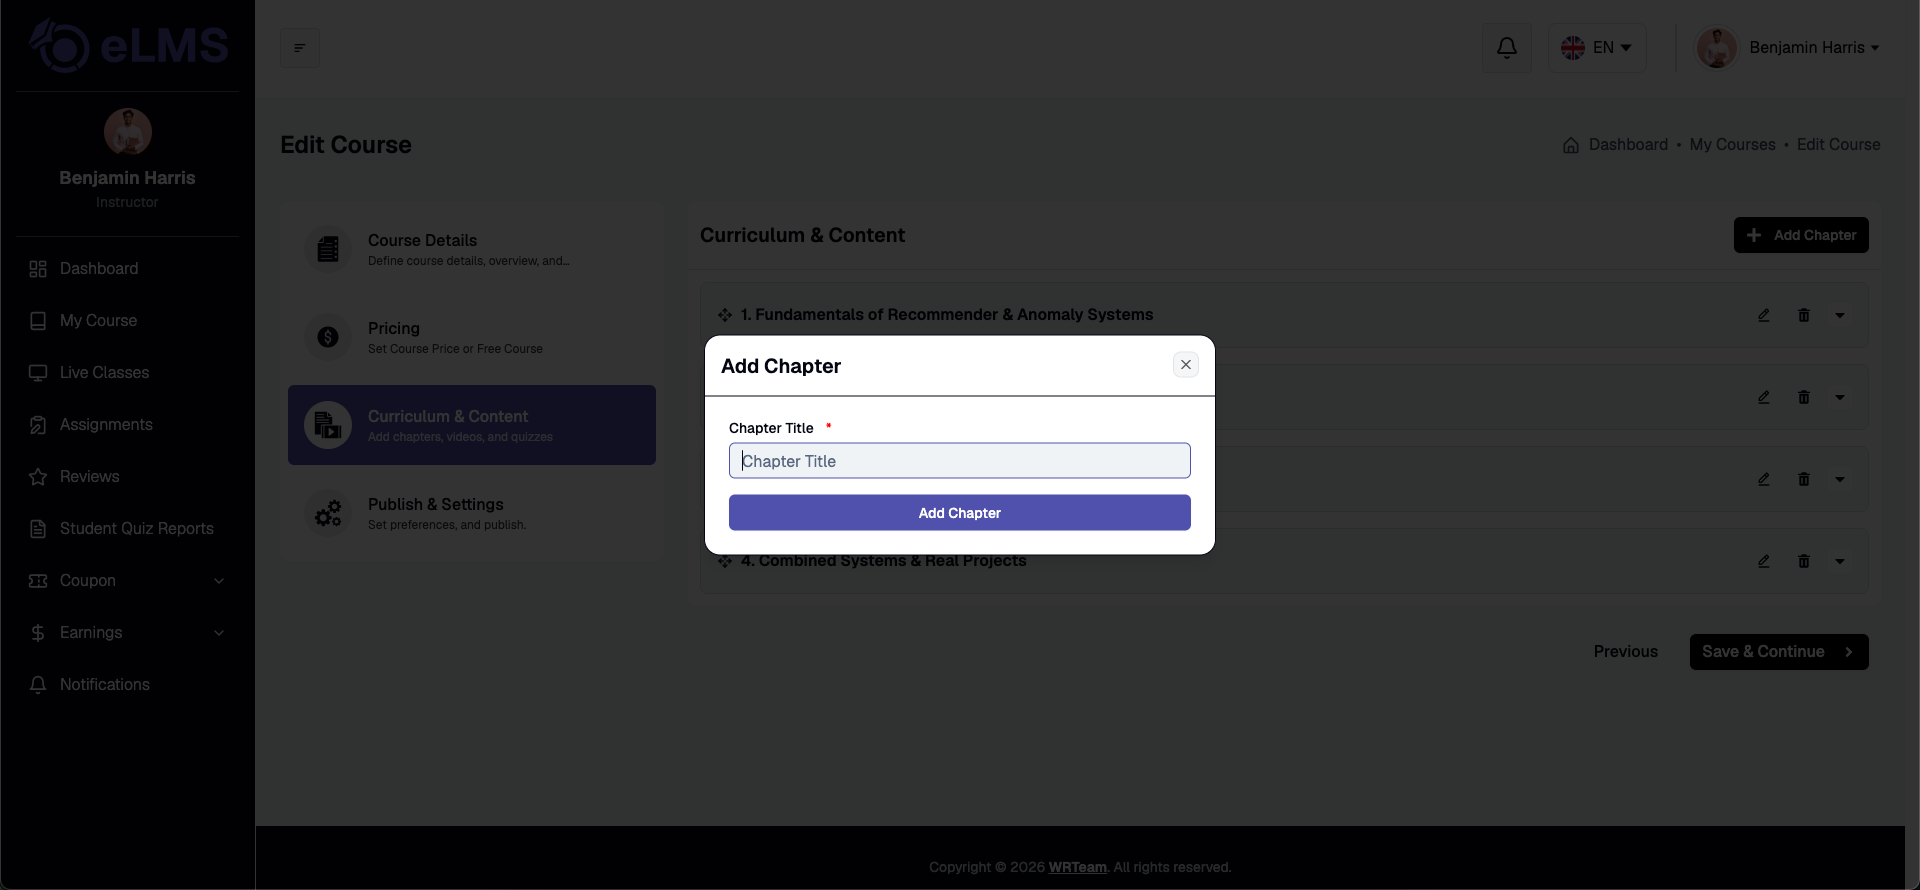
- Click the + Add Chapter button at the top right of the Curriculum & Content tab.
- Enter the Chapter Title (Required).
- Click Add Chapter to save the chapter module.
- (Optional) Reorder chapters using drag-and-drop or expand/collapse modules as needed.
Step 2: Add Curriculum Content Items
Within each created chapter, instructors can add four types of curriculum content:
1. Add Lecture
Allows adding video lessons and supporting materials:
- Under the target chapter, click the + Lecture button.
- Enter the Lecture Title (Required).
- Select the Lecture Type (YouTube URL or File Upload).
- Enter or upload the video source URL / File.
- (Optional) Toggle Check this to allow students to preview this lecture for free preview access before enrollment.
- (Optional) Click + Add Resources to attach supplementary files (Title, Type, File/URL).
- Click Submit Lecture to save.
2. Add Quiz
Adding a quiz is a two-part step-by-step process:
Part 1: Create the Quiz
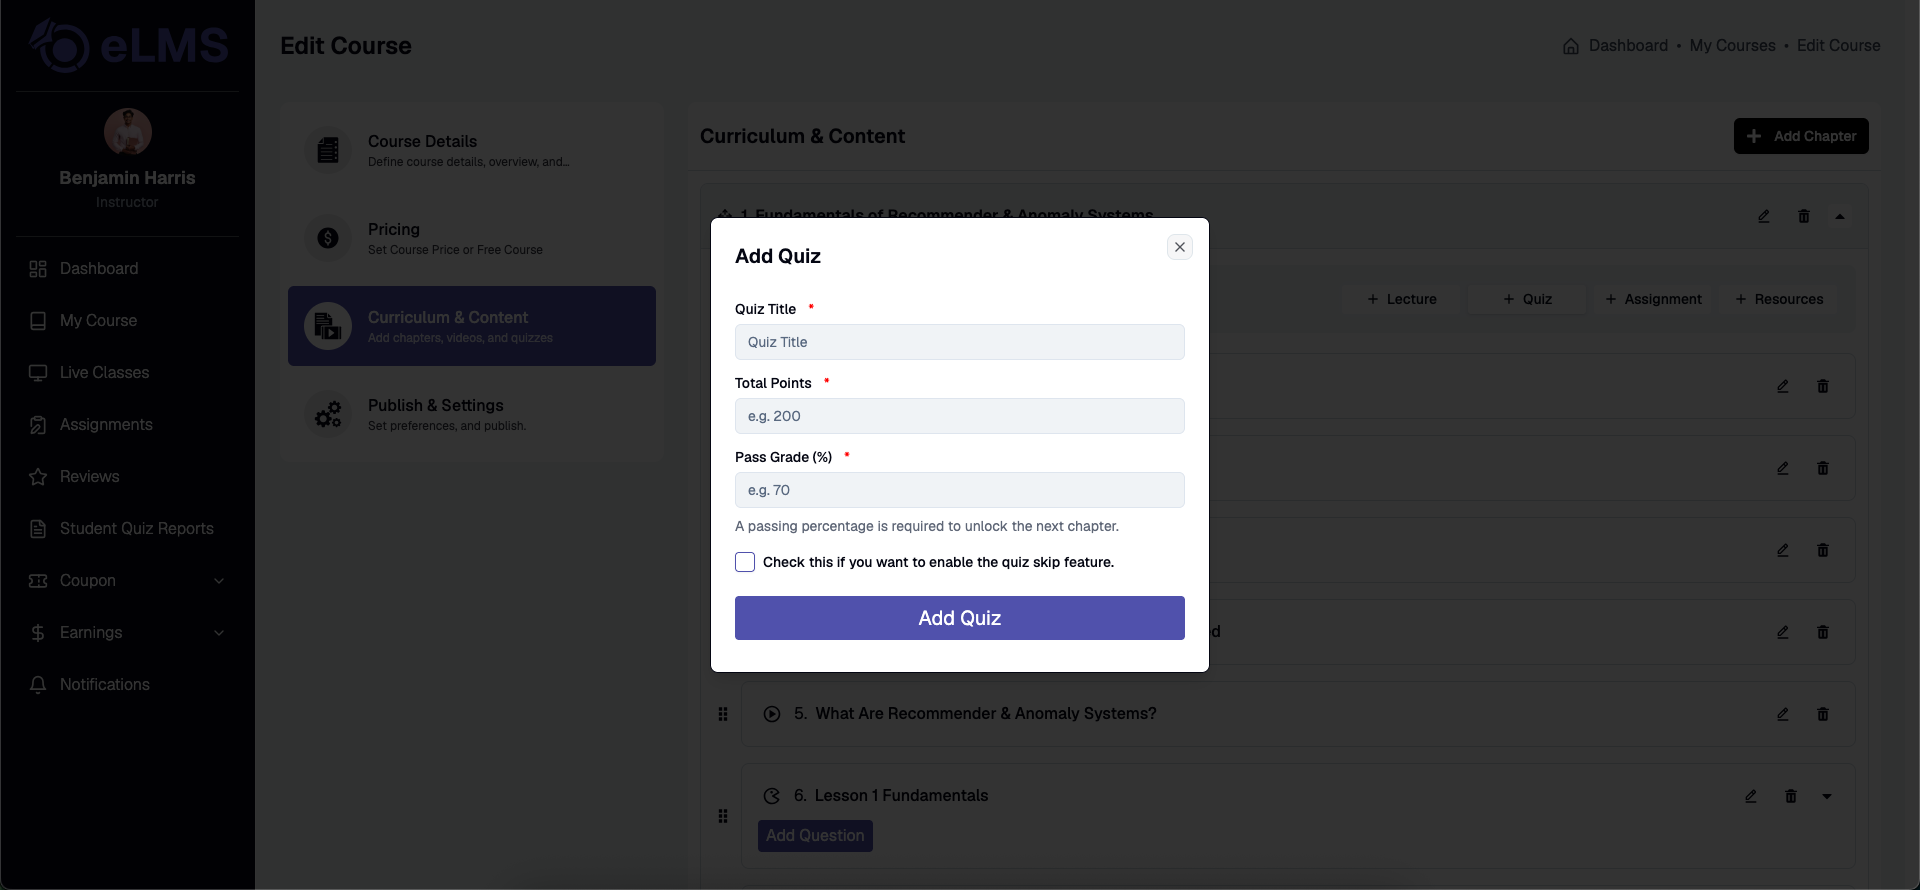
- Under the target chapter, click the + Quiz button.
- Enter the Quiz Title (Required).
- Set the Total Points (Required).
- Enter the Pass Grade (%) (Required) required to unlock subsequent chapters.
- (Optional) Enable Check this if you want to enable the quiz skip feature to allow students to bypass the quiz.
- Click Add Quiz to create the quiz.
Part 2: Add Quiz Questions & Answers
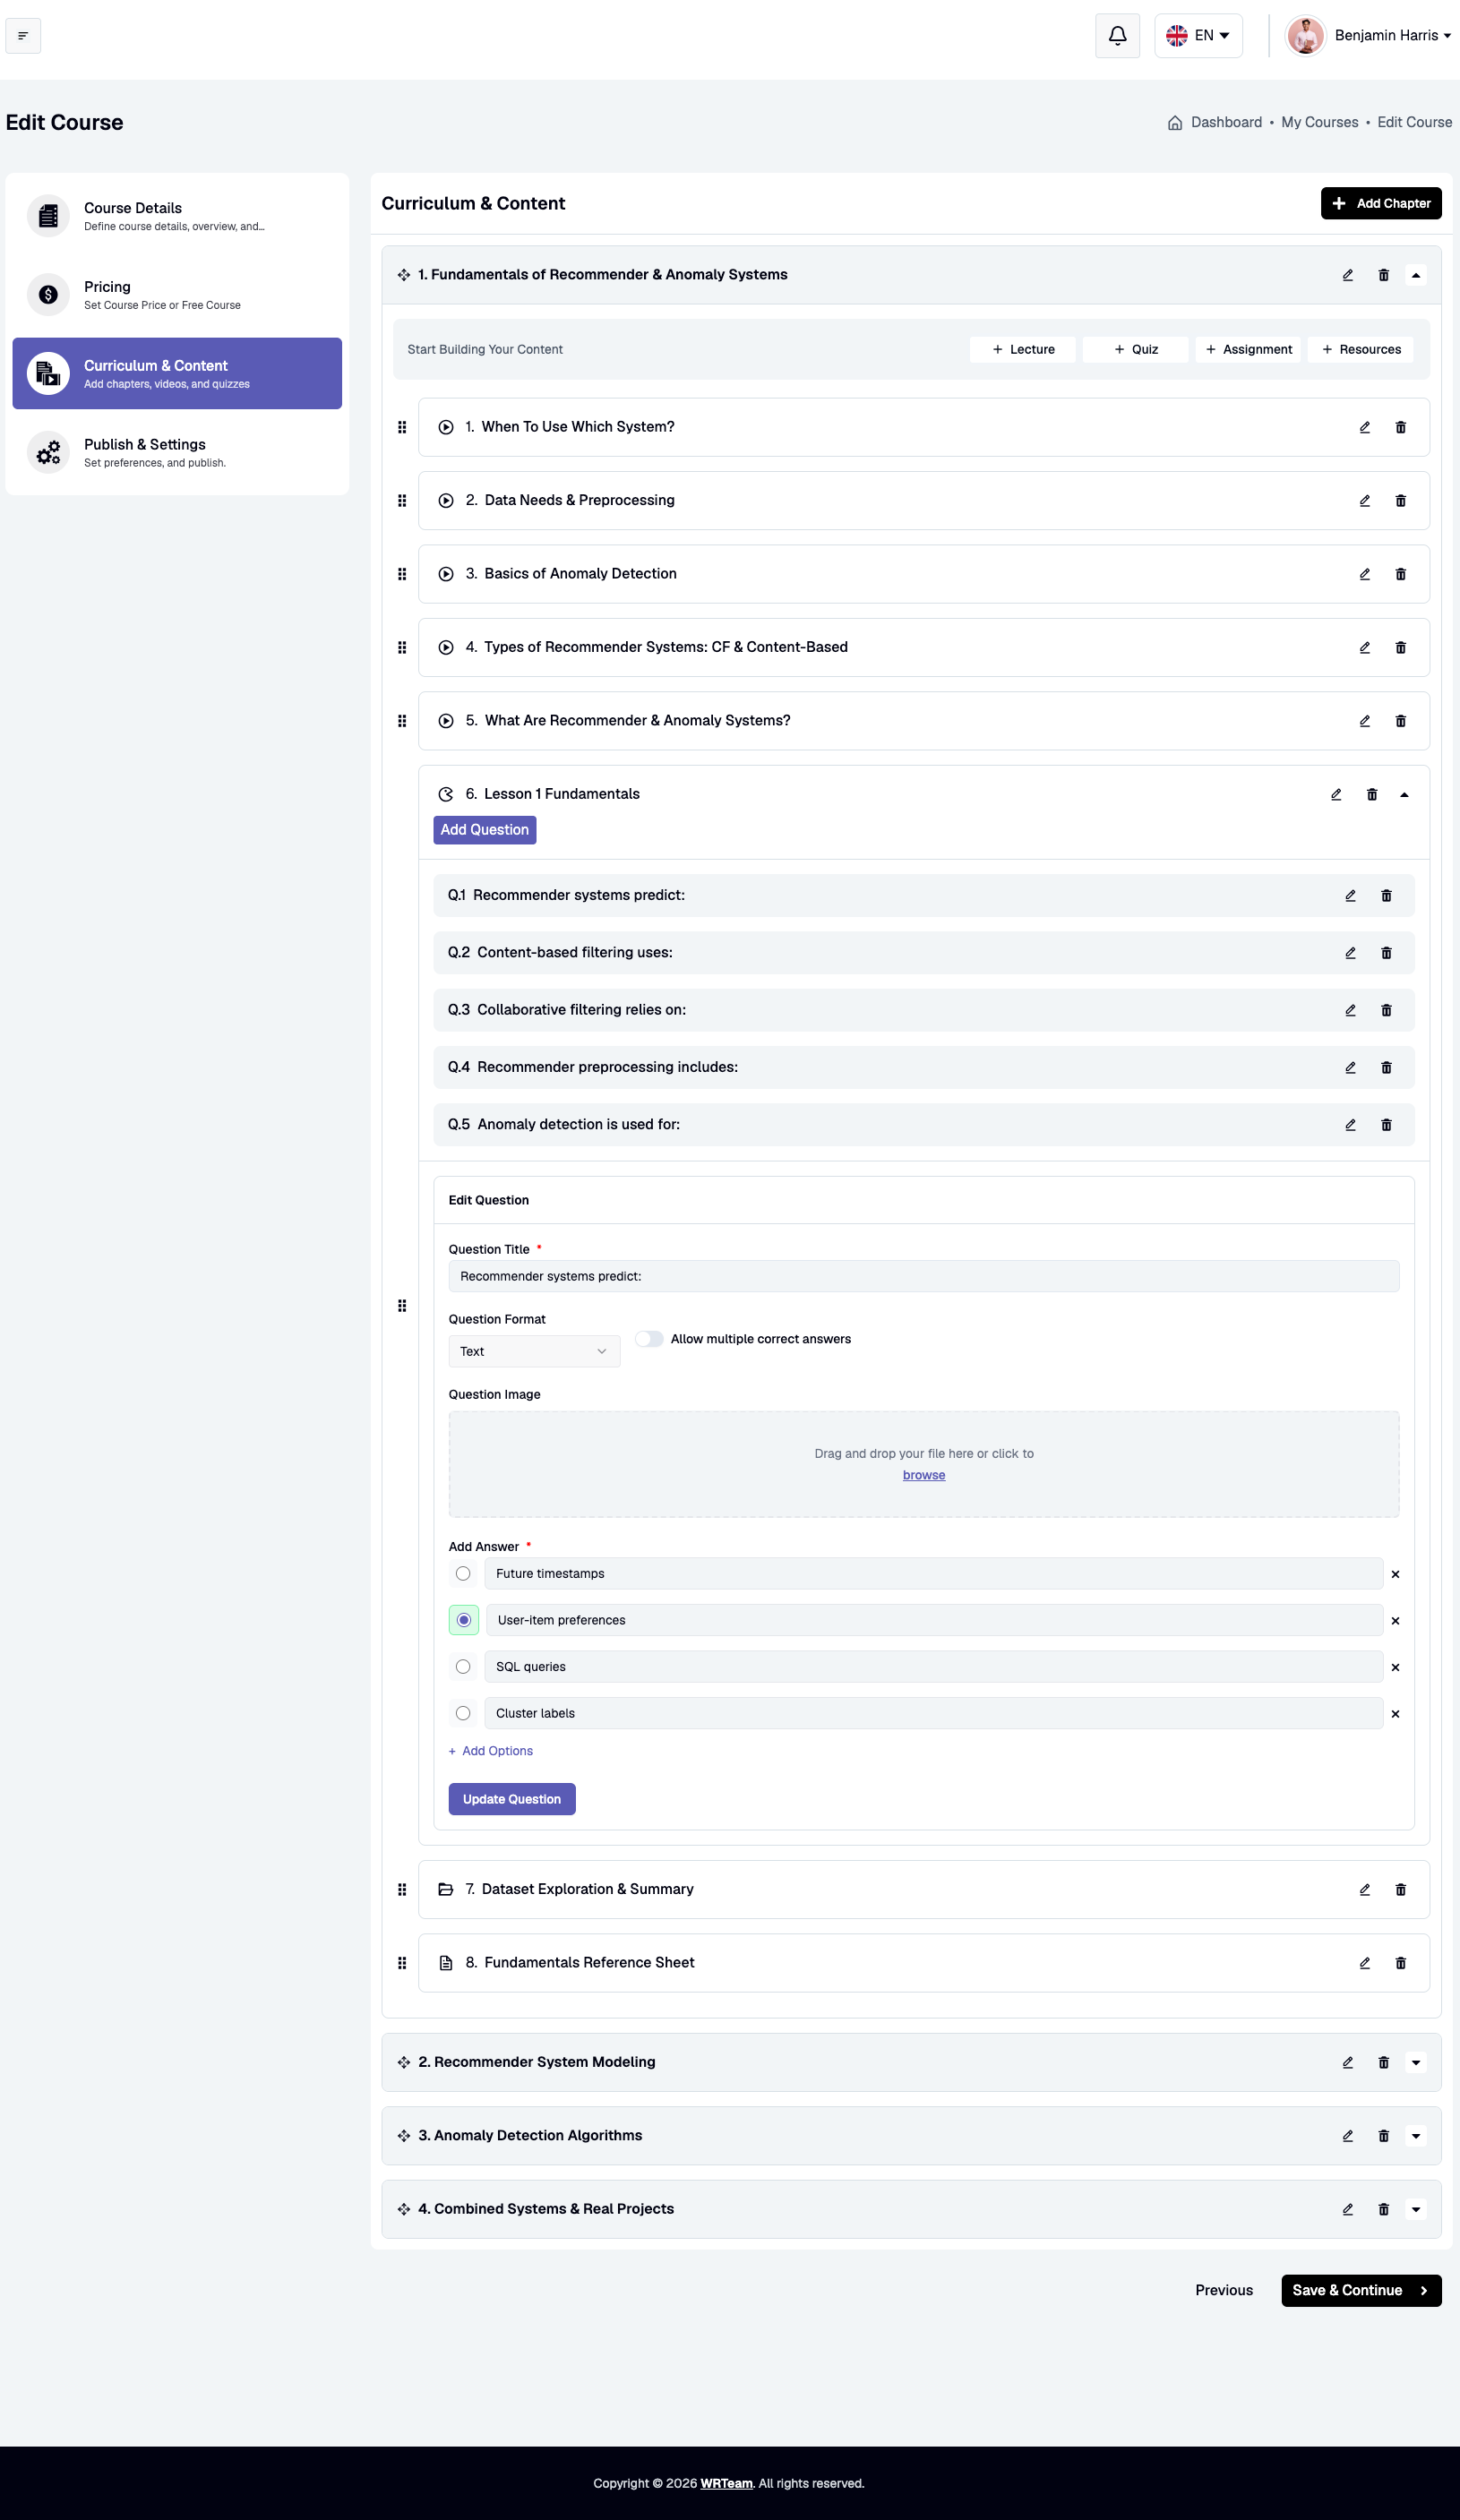
- Locate the created quiz inside the chapter item list and click Add Question.
- Enter the Question Title (Required).
- Select the Question Format (e.g., Text).
- (Optional) Enable Allow multiple correct answers if the question has more than one correct choice.
- (Optional) Upload a Question Image by dragging and dropping or browsing your files.
- Under Add Answer, enter the option choices. Click + Add Options to add more answer choices.
- Select the radio button next to the correct answer choice.
- Click Update Question to save the question. Repeat this step for each question in the quiz.
3. Add Assignment
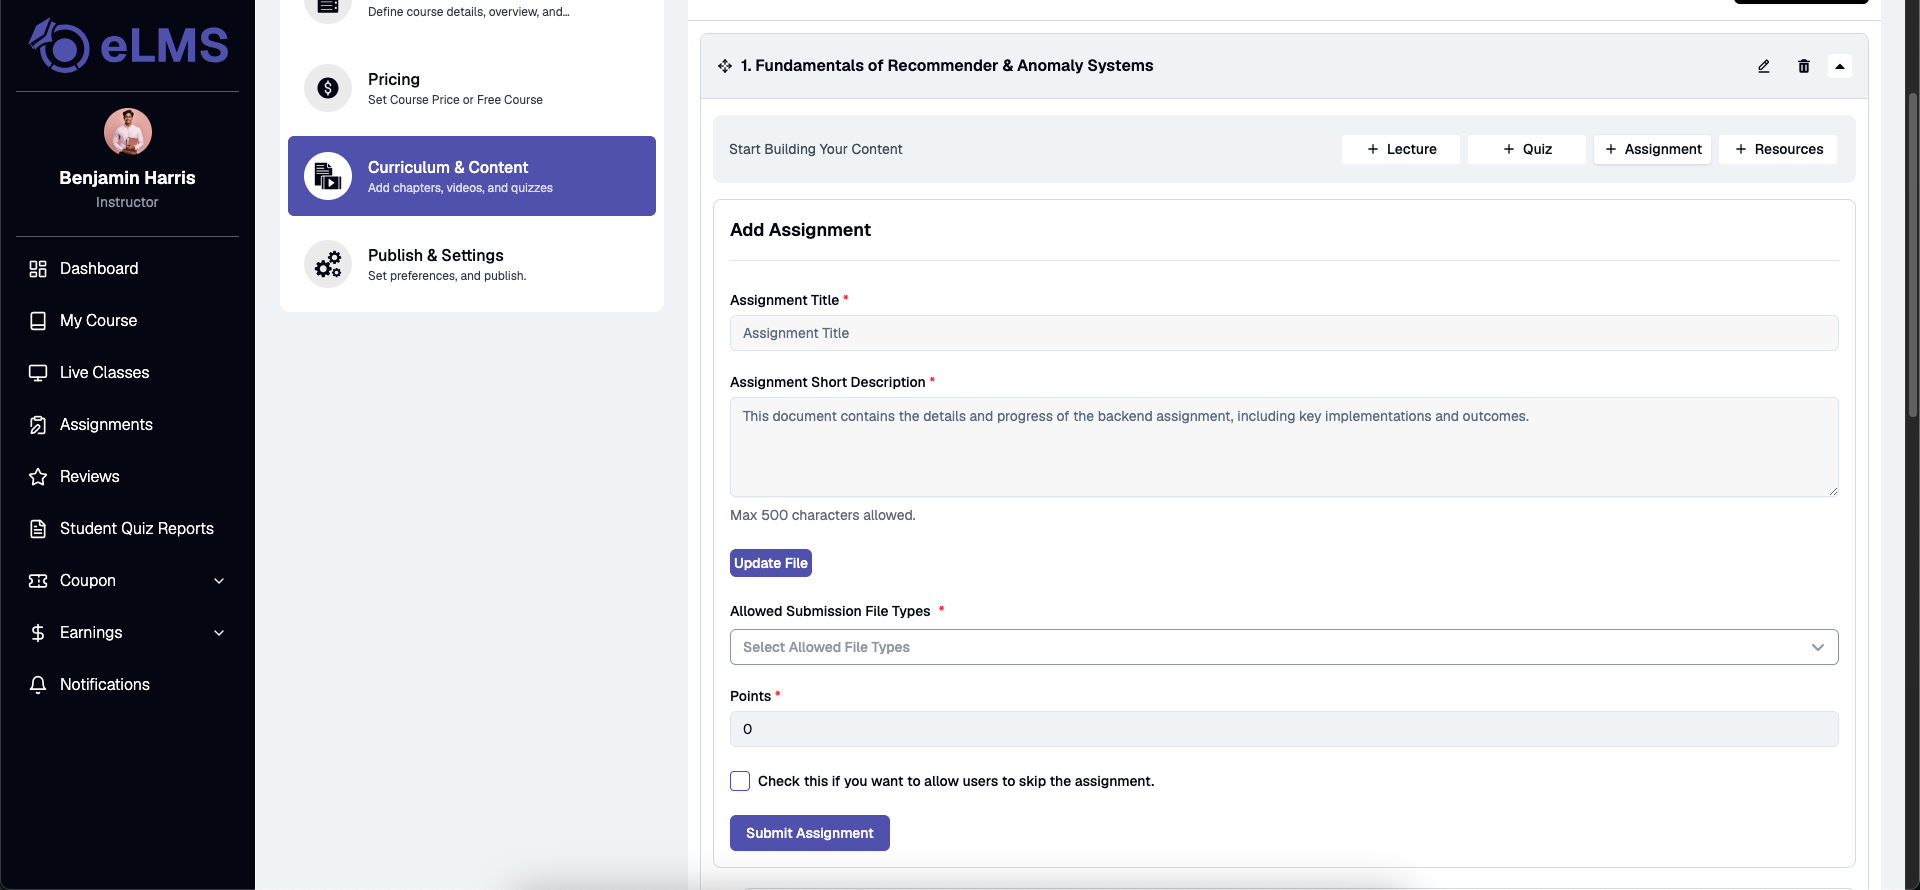
Allows creating practical assignments for student submission:
- Under the target chapter, click the + Assignment button.
- Enter the Assignment Title (Required).
- Enter the Assignment Short Description (Required) with task instructions (Max 500 characters).
- (Optional) Click Upload File to attach guidelines or project files.
- Select the Allowed Submission File Types (Required, e.g., Image, Video, Audio, Document).
- Set the Points (Required) allocated for the assignment.
- (Optional) Enable Check this if you want to allow users to skip the assignment.
- Click Submit Assignment to save.
4. Add Resources
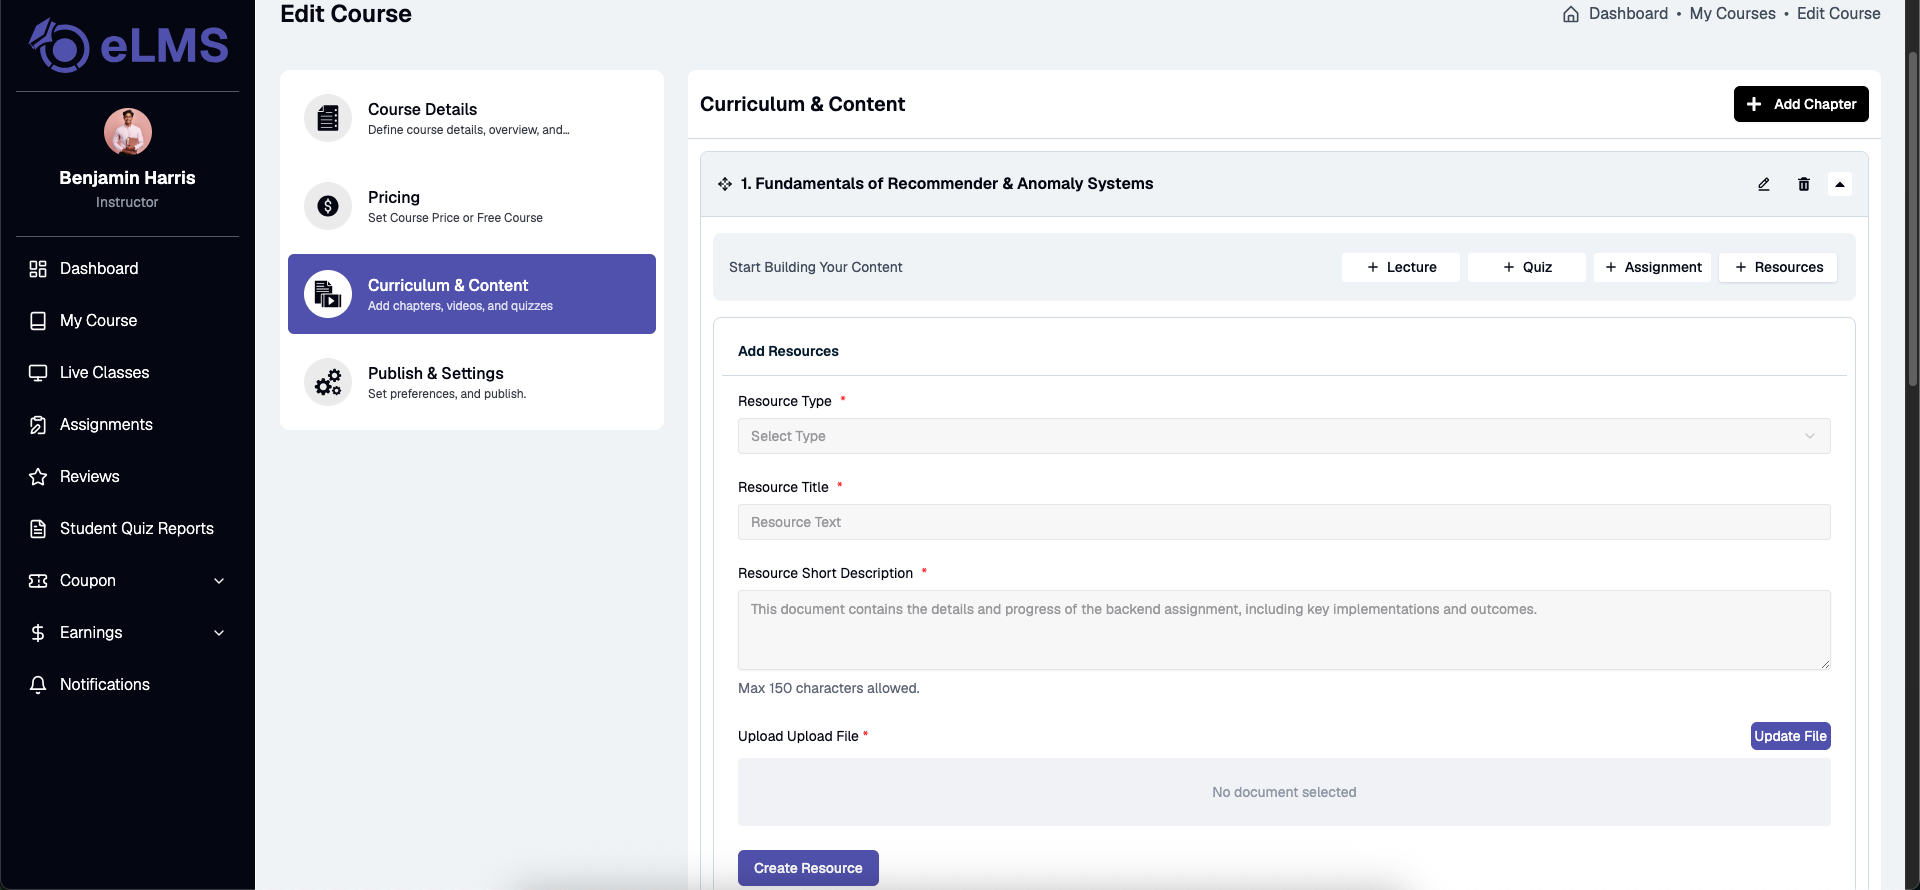
Allows attaching standalone study materials to the chapter:
- Under the target chapter, click the + Resources button.
- Select the Resource Type (Required, e.g., Image, Audio, Video, External URL, Document).
- Enter the Resource Title (Required).
- Enter the Resource Short Description (Required) (Max 150 characters).
- Upload the file or enter the external reference link (Upload File / URL) (Required).
- Click Create Resource to save.
Step 4: Publish & Settings
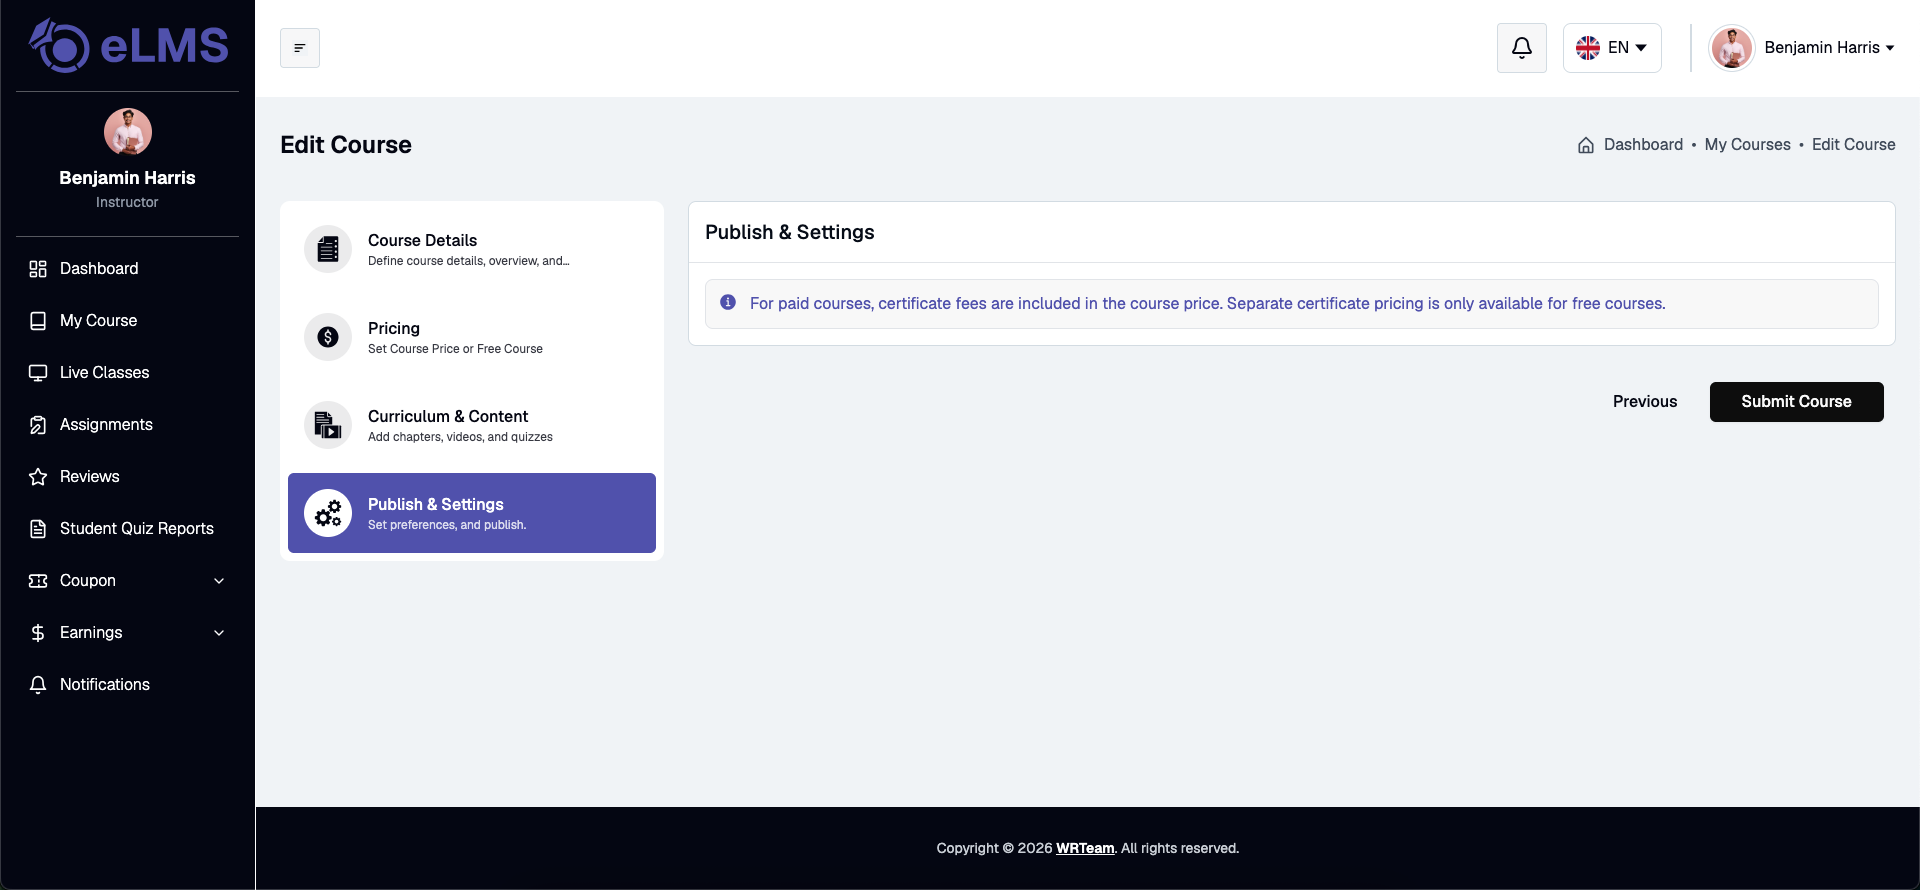
Configures publishing rules and certificates:
- Certificate Settings: For paid courses, certificate fees are included in the course price. For free courses, certificate pricing can be configured separately with an unlock amount option.
- Submit Course: Submits the course to admin panel for review and publication.
Step 5: Course Review
Each newly submitted course is sent to the admin for approval and appears under Course Publish Requests in the admin panel, where it can be approved or declined.
Course Details Tabs
Clicking View Details on any course opens the Course Details page with seven dedicated management tabs:
1. Course Statistics
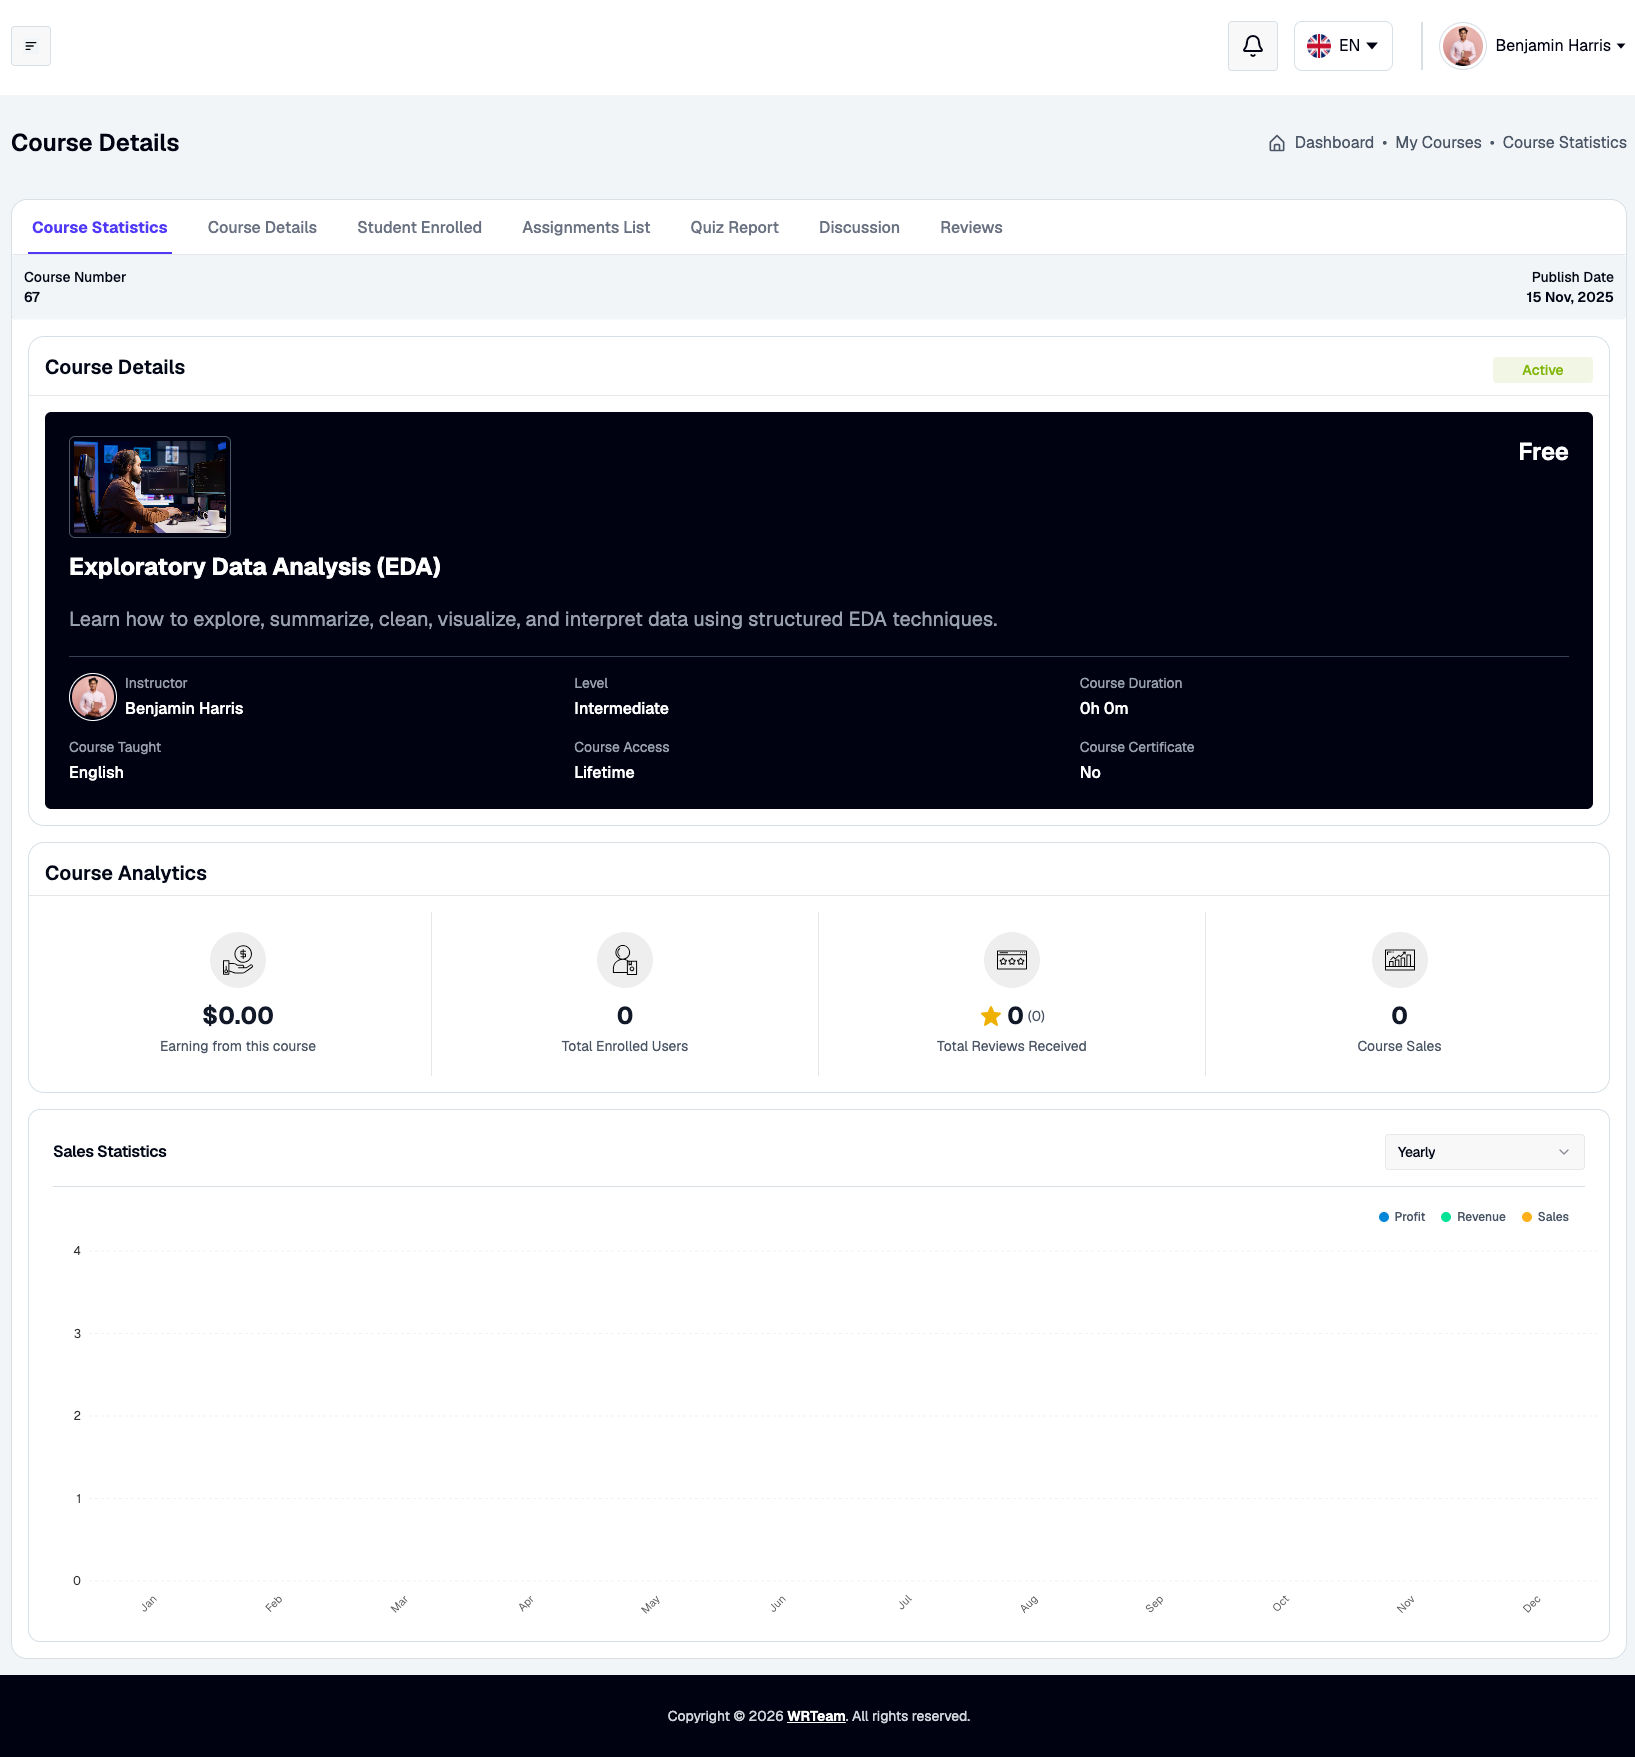
The Course Statistics tab provides a complete analytical dashboard for the selected course:
- Course Details Header: Displays course thumbnail, title, short description, instructor name, difficulty level, course duration, language taught, access type (e.g., Lifetime), certificate availability, course number, publish date, and active/inactive status.
- Course Analytics Cards:
- Earnings from this course: Total revenue generated from the course.
- Total Enrolled Users: Number of students enrolled.
- Total Reviews Received: Average rating score and total review count.
- Course Sales: Total number of sales transactions.
- Sales Statistics Chart: Graphical analytics for Profit, Revenue, and Sales with time filter options (Yearly, Monthly, Weekly).
2. Course Details
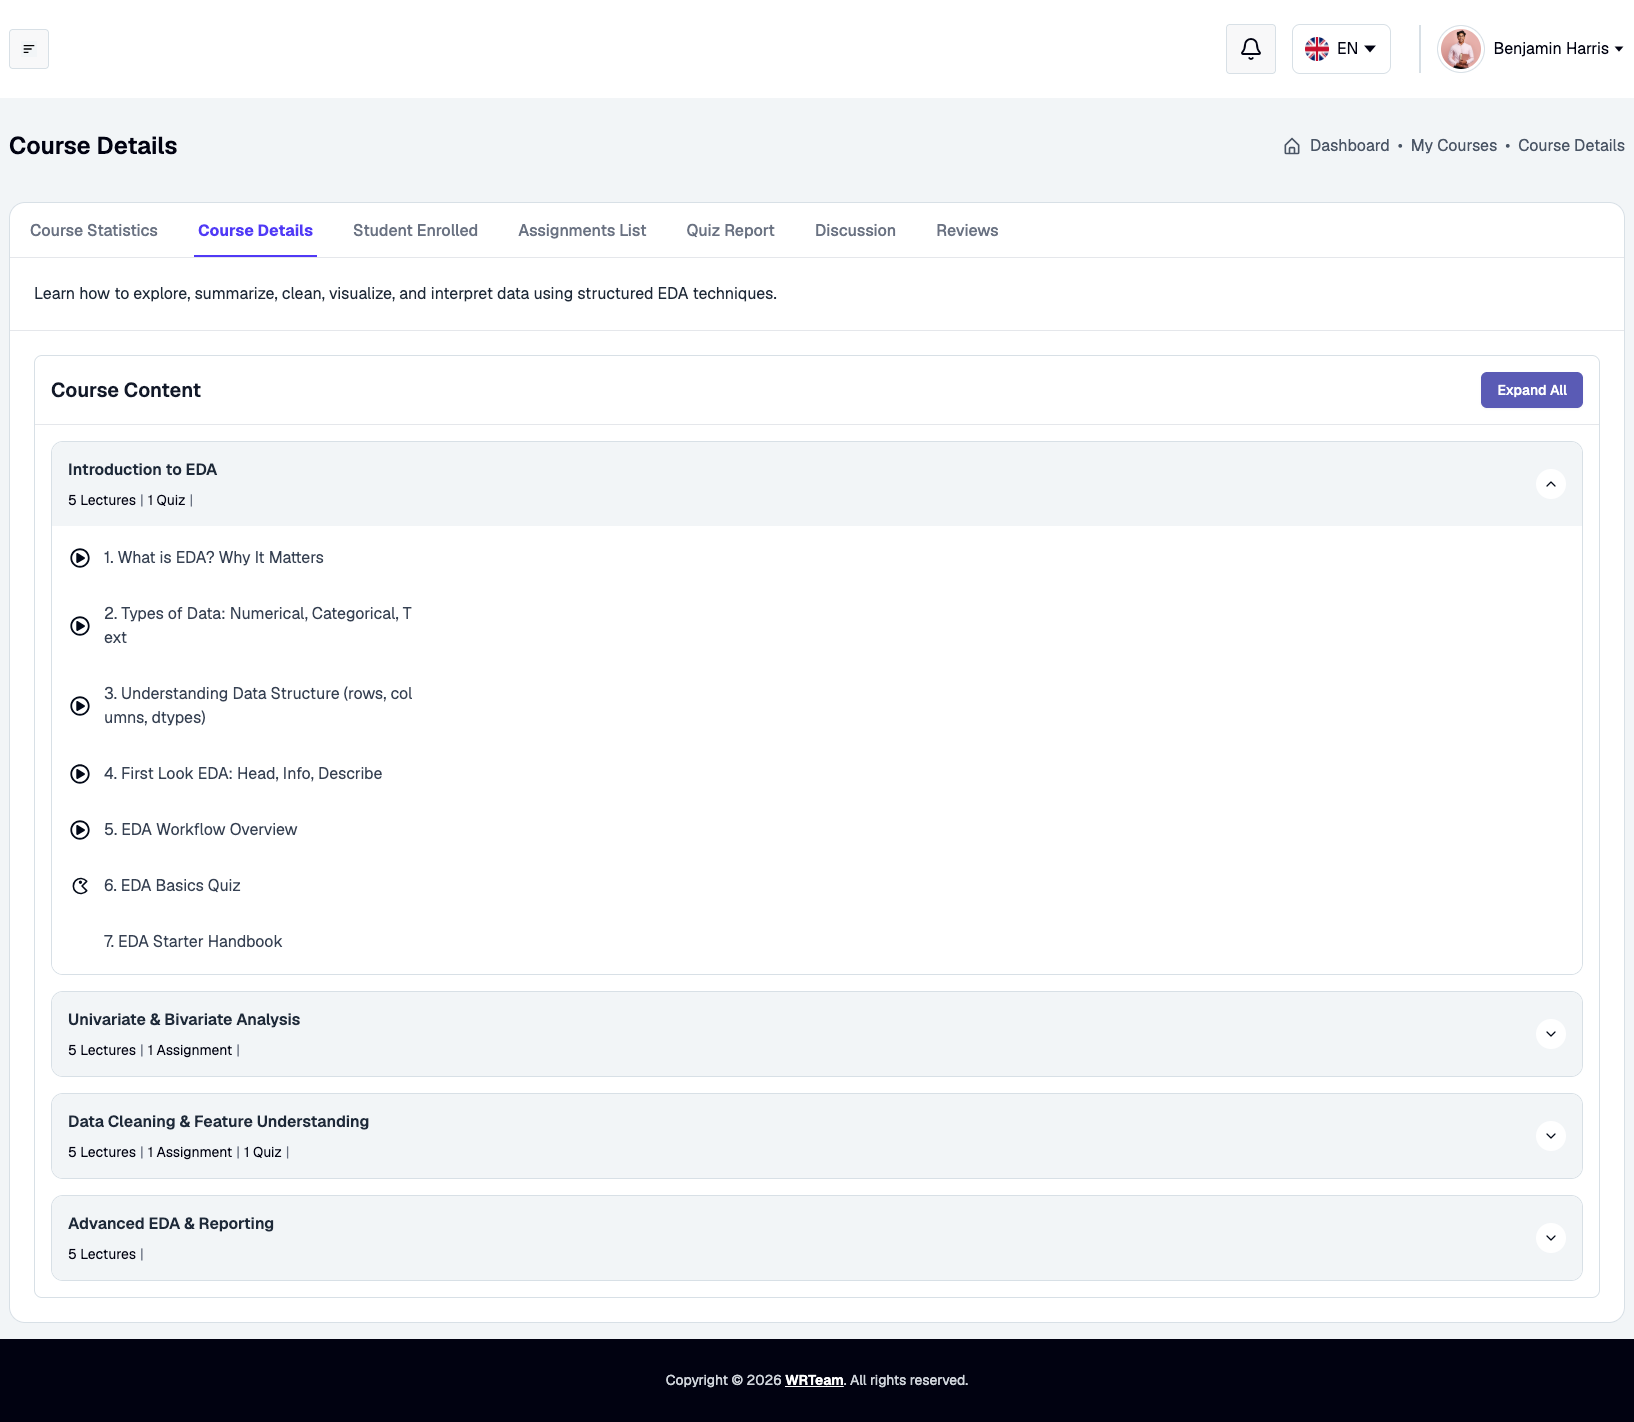
The Course Details tab displays the complete course overview and content structure:
- Course Description: Detailed explanation of course goals and covered topics.
- Course Content Tree: Expandable chapter sections showing lecture counts, quiz counts, assignment counts, resource attachments, and specific topic lists. An Expand All button allows viewing all content sections simultaneously.
3. Student Enrolled
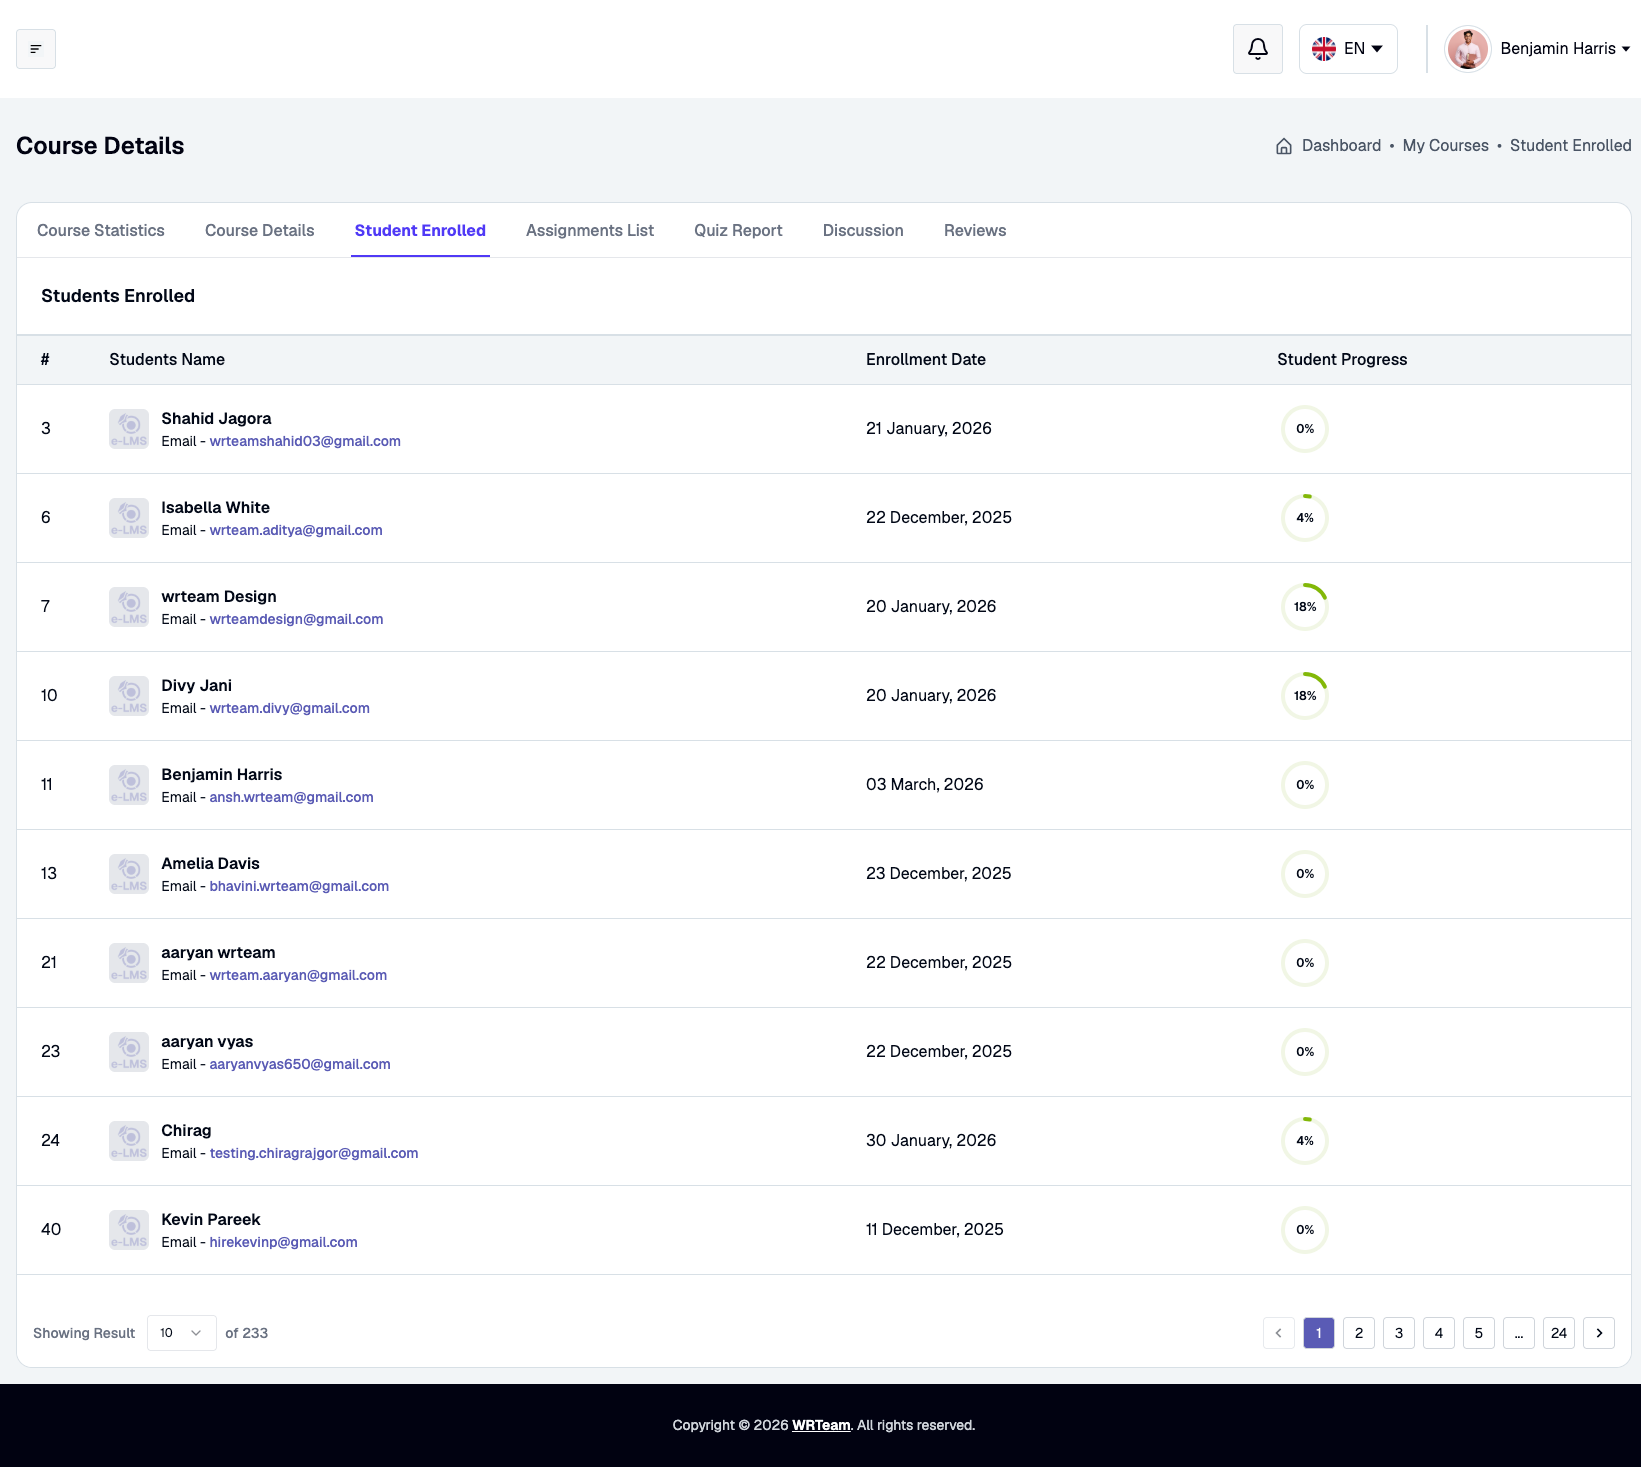
The Student Enrolled tab lists all students currently registered for the course:
- #: Index or ID.
- Students Name & Email: Student full name and account email address.
- Enrollment Date: Date when the student registered for the course.
- Student Progress: Visual percentage completion indicator showing student course progress.
4. Assignments List
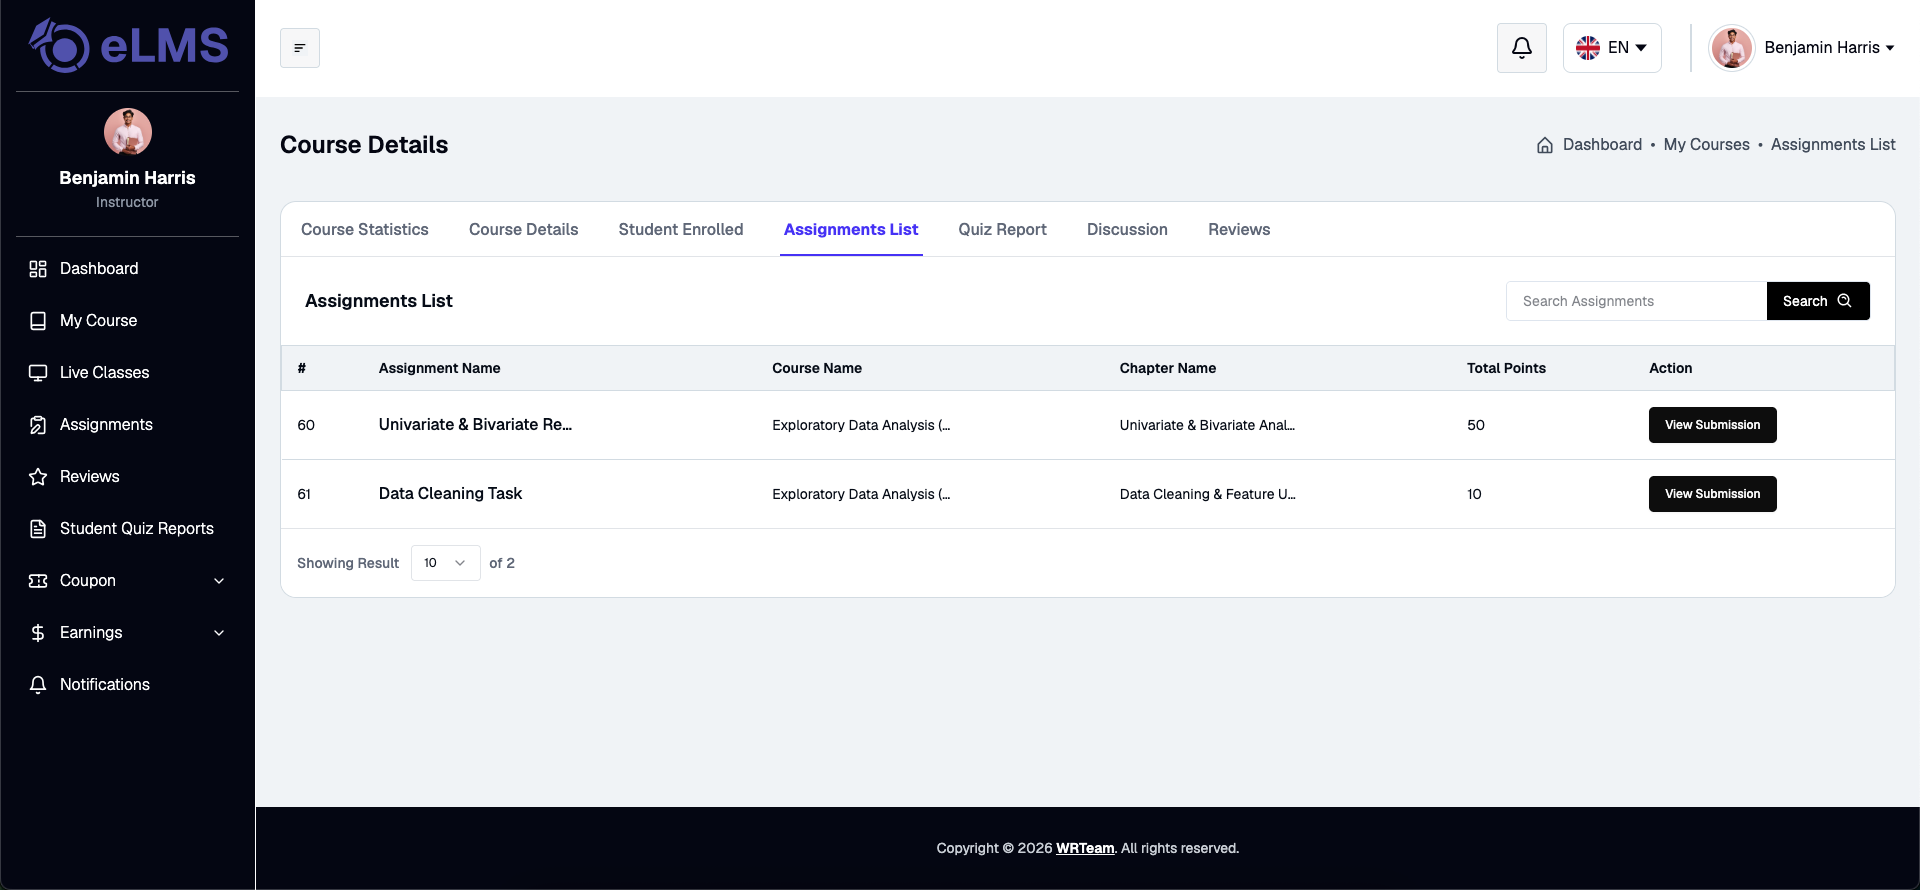
The Assignments List tab provides tracking for all course assignments:
- Assignment Name: Title of the assignment task.
- Course Name & Chapter Name: Associated course title and chapter section.
- Total Points: Maximum marks assigned for the task.
- Action (View Submission): Button to view all student submissions, grade responses, and provide notes.
5. Quiz Report
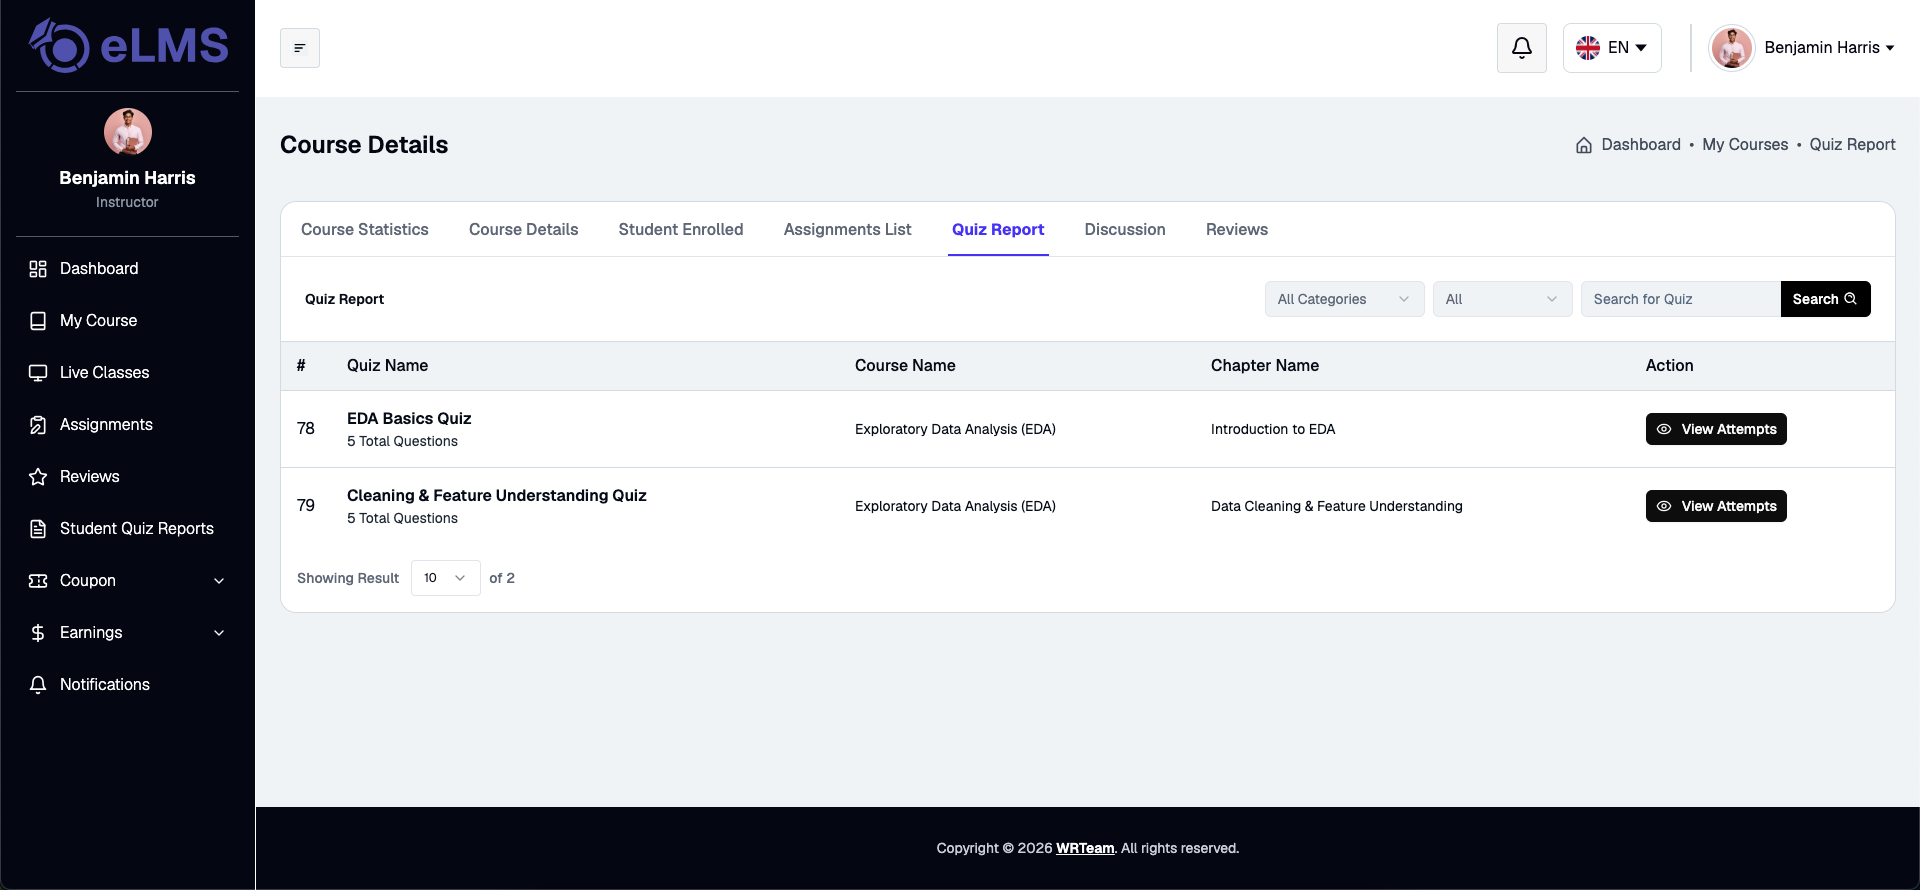
The Quiz Report tab lists all quizzes within the course along with category and search filters:
- Quiz Name & Questions: Quiz title and total question count.
- Course Name & Chapter Name: Chapter section where the quiz is located.
- Action (View Attempts): Button to open detailed student performance and attempt records.
Quiz Report Details
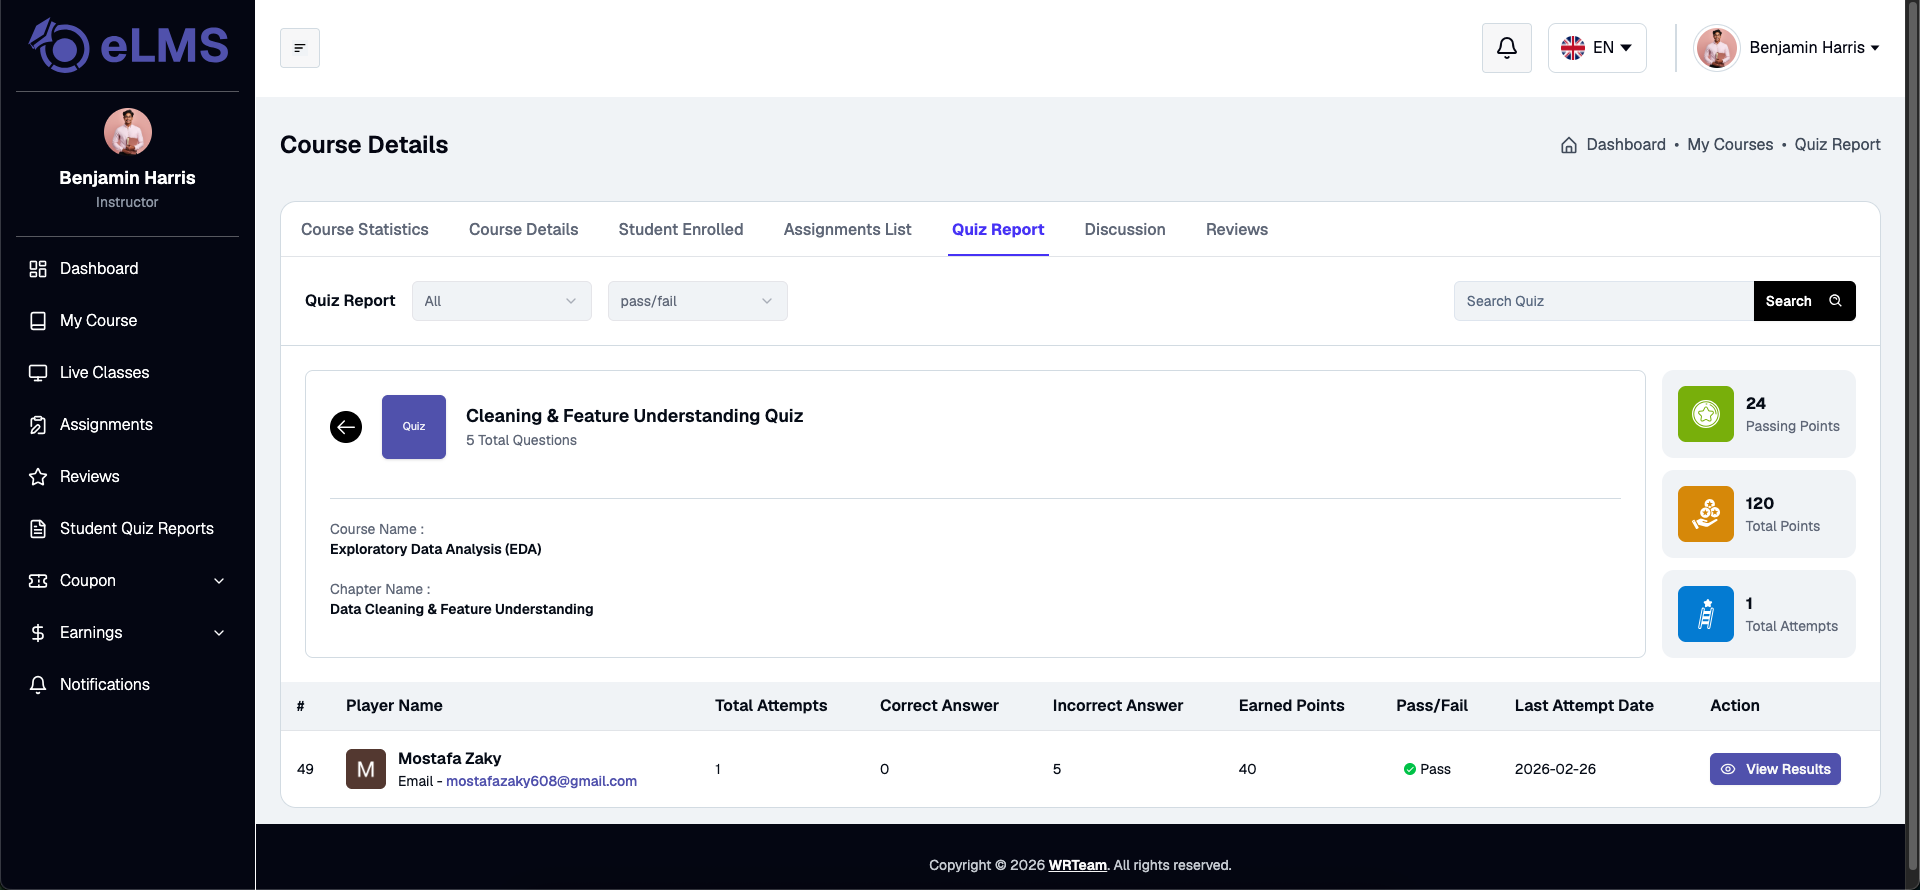
Inside View Attempts, instructors can inspect comprehensive attempt metrics:
- Summary Metrics: Displays Passing Points threshold, Total Points available, and Total Attempts count.
- Student Performance Table:
- Player Name & Email: Student details.
- Total Attempts: Number of attempt tries made by the student.
- Correct Answer & Incorrect Answer: Counts of correct and wrong responses.
- Earned Points: Total marks obtained.
- Pass/Fail Status: Badge indicating whether the student met the pass grade.
- Last Attempt Date: Date and time of the latest attempt.
- Action (View Results): Option to review individual question answers.
6. Discussion
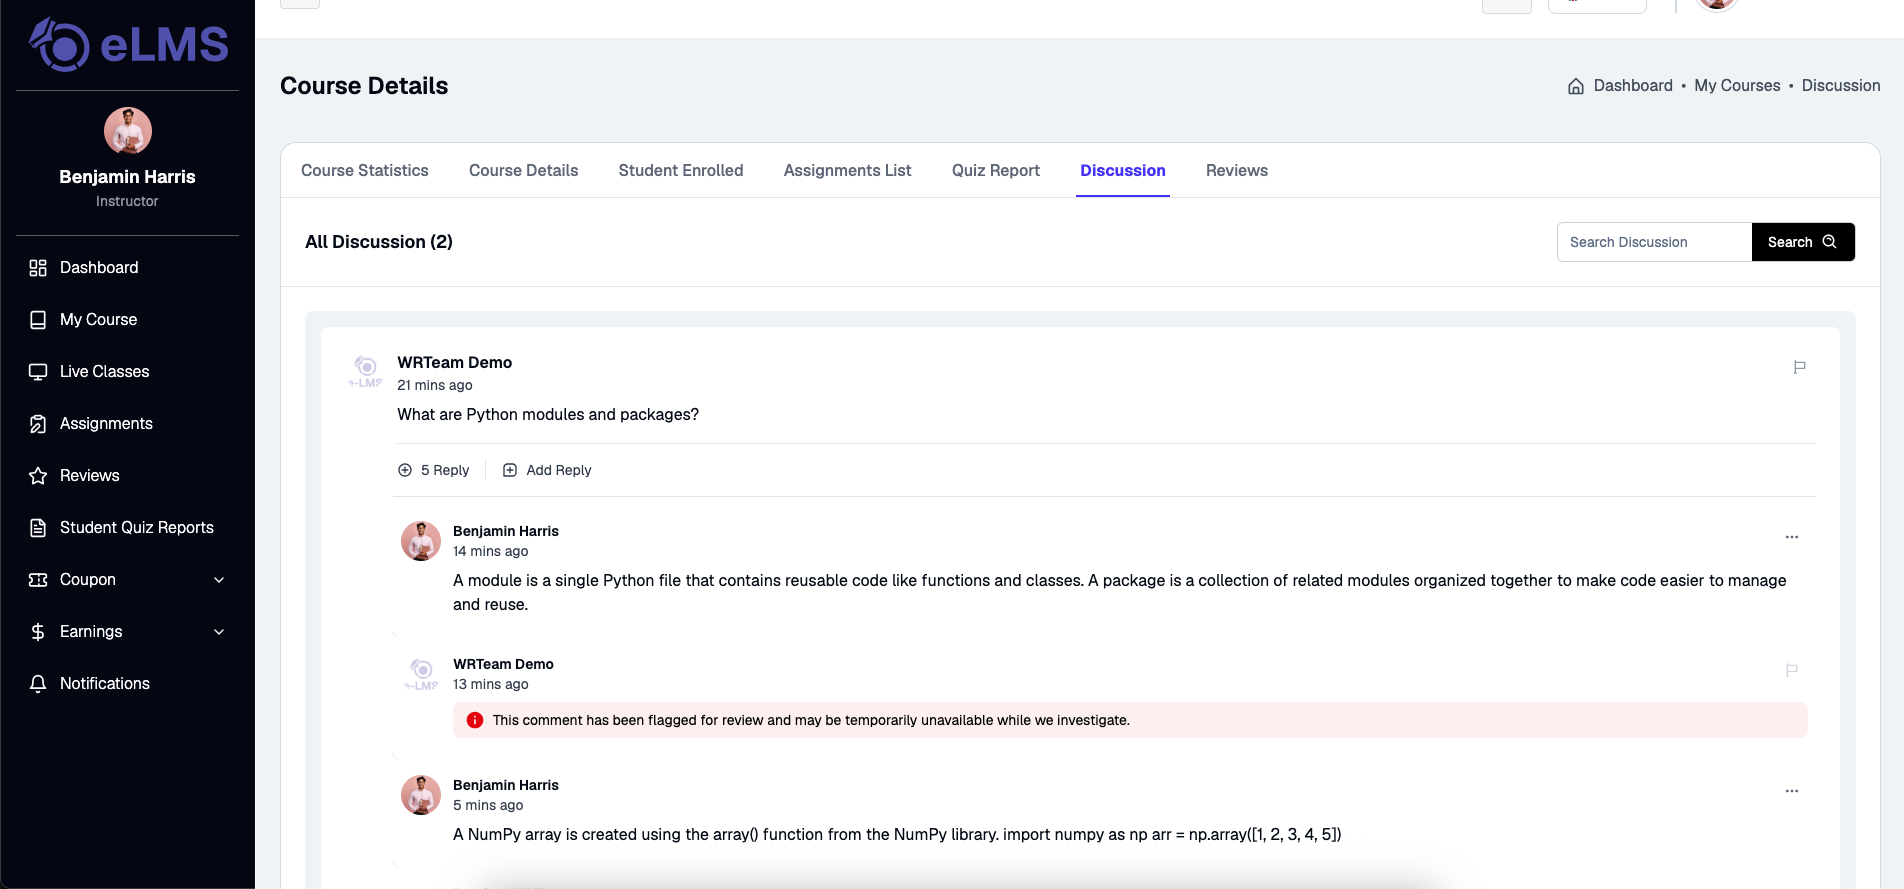
The Discussion tab serves as the main Q&A thread management center:
- Discussion Posts: Student questions and discussion topics.
- Replies: Interactive thread replies from instructors and co-instructors.
- Moderation Tools: Action buttons to add replies or flag inappropriate comments.
7. Reviews
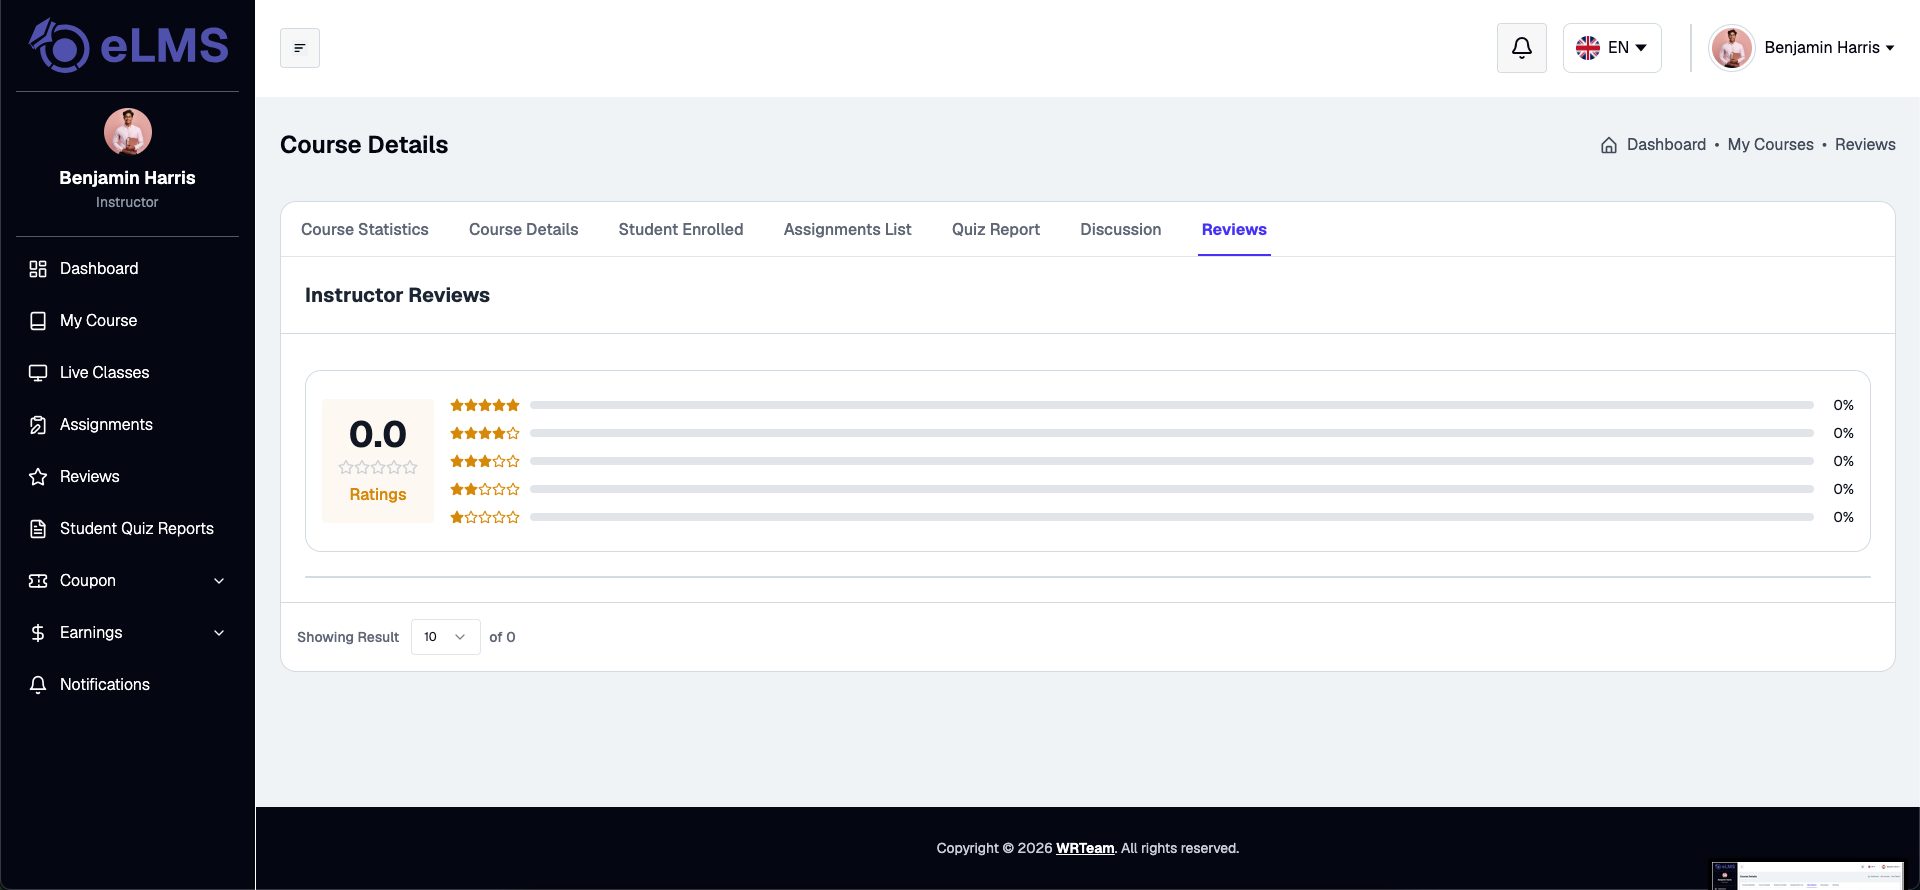
The Reviews tab presents student ratings and reviews:
- Average Rating: Overall star rating average (0.0 to 5.0).
- Rating Distribution: Percentage breakdown for 5-star through 1-star ratings.
- Reviews List: Individual student review messages and star ratings.